
This is an old revision of the document!
Table of Contents
Start Page » DEMoCap: Drag[en]gine Motion Capture » Low Level Motion Transfer: Side View Camera
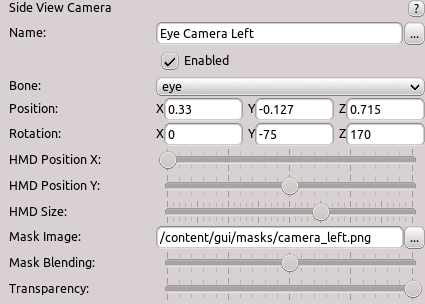
The side view motion transfer adds a camera attached to a bone. It allows the motion capture actor to see side-wards in addition to the normal viewing direction. This is particularly useful for reptile-type characters with eyes facing side-wards as well as other situations where it is useful for a motion capture actor to see into also into a different direction that the main view direction. The camera is displayed as a small overlay view in the HMD.
Motion Transfer Menu
Click the button … to show the motion transfer menu. It contains these entries:
Preset Left Eye
Apply a preset camera configuration optimized for viewing from the left eye position. This preset automatically sets the camera bone, position, rotation and HMD settings to suitable default values for left eye viewing.
Preset Right Eye
Apply a preset camera configuration optimized for viewing from the right eye position. This preset automatically sets the camera bone, position, rotation and HMD settings to suitable default values for right eye viewing.
Mirror Side Camera
Mirror the current camera configuration. This operation flips the camera position and rotation across the appropriate axis, useful for creating a mirrored camera setup (for example, switching from left to right side).
Name
Name of motion transfer to identify it in the list. Name is required to be unique.
Camera Bone
Bone to attach the camera to. Click on the label or the combo box to activate bone selection mode. Click in the preview window on a bone to select it. The selected bone is marked in red. Motion transfer has no effect if not set.
Camera Position
Position of the camera relative to the selected bone. Specified as X, Y and Z offsets. Allows positioning the camera at the desired location relative to the bone.
Camera Rotation
Rotation of the camera relative to the selected bone. Specified as rotation around X, Y and Z axes. Allows orienting the camera towards the desired viewing direction.
HMD Position X
X position of the camera view in the HMD display. The value is in the range from 0 (left edge) to 20 (right edge). Controls the horizontal placement of the side view window within the HMD viewport.
HMD Position Y
Y position of the camera view in the HMD display. The value is in the range from 0 (top) to 20 (bottom). Controls the vertical placement of the side view window within the HMD viewport.
HMD Size
Size of the camera view window in the HMD.
Mask Image
Path to a mask image for camera view blending. The mask image is used to blend the camera view into the HMD display, allowing for smooth or custom edge transitions. Leave empty to use no mask. The mask image works similar to wipe images from video editing. It is a grayscale image with 0 indicating transparent and 1 indicating opaque. Using mask blending the grayscale values are scaled using 1 as origin. This allows then to fine tune how sharp the transition is from opaque to transparent.
Mask Blending
Blur of the mask in the range from 0 (sharp) to 20 (blurry). Controls the softness of the mask edge, allowing for gradual transitions between the masked and unmasked areas.
Transparency
Transparency of the camera view in the range from 0 (fully transparent) to 20 (fully opaque). Transparency is applied in addition to mask blending.
Show in Live Mode
If ticked, the side view camera is displayed in live mode during motion capture sessions. If unticked, the camera view is hidden in live mode. The side view camera is always hidden if capturing is in progress, capture is played back or the main VR menu is open.


