This is an old revision of the document!
Table of Contents
Start Page » DragonScript Scripting Language » Locomotion
Locomotion
Locomotion defines the movement, looking, turnging and stance states of actors. The DragonScript module provides basic locomotion implementation using the locomotion class. Three kinds of locomotion types are well supported and can be extended according to needs. For performance reasons the locomotion class is implemented as native class. It is possible to extend the behavior but requires extending the class in a specific way to work. Whenever the player or an AI routine creates input new goals are set in the locomotion. The locomotion class then updates the actual values. Internal this uses smooth values to smoothly apply changes over time. The resulting parameters can then be used to update colliders for collision testing and animator instances for calculating animation states.
Natural Locomotion
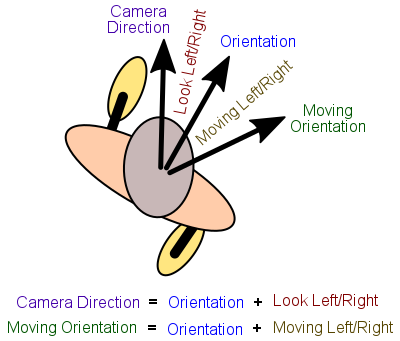
Natural locomotion provides a smooth moving actor locomotion behavior that mimicks a natural locomotion pattern. This is the most complex calculation method but yields a result which is more natural than the other types. With natural locomotion the body orientation is the major orientation. The major orientation is the orientation lining up with the component, collider and game element orientation. All other orientations are relative to this major orientation. The looking left/right is applied ontop of the body orientation resulting in the camera direction. This is the direction a first person camera faces. This mimicks real world locomotion where somebody looks first into the direction he is going to turn before actually gently applying the turning. As a result actors move in a slight arc around corners which is not only more natural it also avoid actors getting stuck at corners. Furthermore the moving left/right defines the movement direction relative to the body orientation. This results in the moving direction which is the direction in which the actor actually moves during the next physics simulation. Moving covers inputs like strafing or moving forward/backward. It is does measured as angle relative to the body orientation in which the actor wants to move. The locomotion class adjusts the body orientation over time to match the moving direction. This also reflects a more natural locomotion since a person moving to the left or right turns the body into the moving direction to some degree. Of course this change is also applied to the look left/right direction but in reverse. So moving to the right the body is turned to the right while looking is towards the left to compensate. The locomotion class takes care of these details. All relative input values can be also analog values which is useful for AI scripts or player doing mouse input. The image below shows the relationship between the major parameters.
Natural locomotion is a good choice for most situations. Actors using natural locomotion move in the direction their body is facing and strafing behavior does not produce broken hips all the time. Another advantage of using natural locomotion is that only a single animation for moving forward and backward is required paired with looking left-right animator rules.
FPS Locomotion
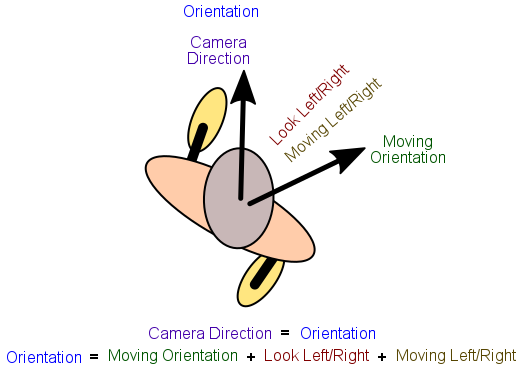
FPS locomotion is best known from FPS games as the name implies. In contrary to natural locomotion the camera direction and body orientation are coupled. The actor component is oriented to look into the same direction the camera is facing. In the case of natural locomotion the body orientation is the major oriented while in the case of FPS locomotion the camera direction is the major orientation. This is a typical coupling in FPS games and allows to animate upper and lower body individually (with the typical broken hip problem). The moving direction is now relative to the camera direction using looking left/right and moving left/right. The image below shows the relationship in the FPS locomotion case.
FPS locomotion is somewhat simpler to understand and is somewhat cheaper to calculate. There are two ways to handle the animation. The first solution is to use the same setup as in the natural locomotion case. Most of the time though an 8-way animation setup is used. In this case 8 animations of walking/running are created each representing the same movement but in a different direction relative to the camera direction. 8 animations are typically chosen this this way each animation is 45 degrees rotate compared to the next animation working well with digital input from 4 direction keys (north, north-west, west, south-west, south, south-east, east, norh-east). This setup requires more animation work to be done but has the advantage that all kinds of moving directions can be blended together with good quality. As a side note this setup could be also used for the naturla locomotion case but it is a bit delicate to get working in a pleasant way. This setup can be easily build using the group animator rule using the select mode. There the 8 animations can be added as 8 rules in the group and selecting being driven by the moving orientation.
Vehicle Locomotion
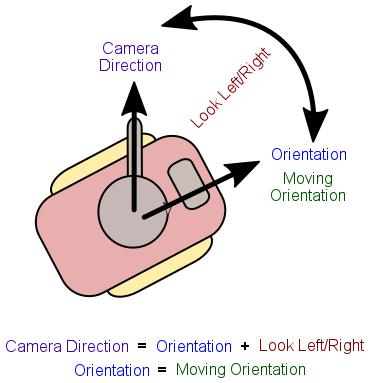
Vehicle locomotion matches the typical tank like controls. Actors can only move into the direction their body is oriented. The major direction is thus the body orientation similar to natural locomotion. The body orientation though never changes except using turning left/right. The looking left/right is only used to point the camera into a direction other than the moving direction. With the tank example this allows to point and fire weapons into a different direction than the vehicle is moving. The image below shows the relationships.
Animator and collider control
Locomotion allows to set an animator instance and mapping controllers. If set the locomotion updates the animator instance controllers with the appropriate locomotion values automatically upon updating. This is a convenience behavior of the locomotion class to improve performance since all this work is repetitive and can be done faster in C++ than inside scripts. The locomotion class documentation contains a list of supported controller mapping constants. The example below shows a typical setup.
// animator instance to manipulate
locomotion.setAnimatorInstance( actorAnimatorInstance )

// controller 0 will be incremented by the elapsed time
locomotion.addControllerMaping( 0, Locomotion.ATTR_ELAPSED_TIME )

// set controller 1 to looking left/right relative to body orientation
locomotion.addControllerMaping( 1, Locomotion.ATTR_LOOK_LEFT_RIGHT )

// upon calling locomotion.updateLocomotion() these controllers will be updated according
// to the mapping constant. not set controllers are left unchanged
Body tilting
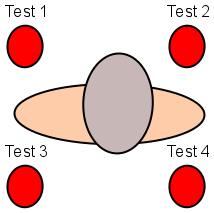
Body tilting provides support to adjust animations of actors to better fit them to uneven ground. Body tilting require collider collision tests to determine the distances required to calculate proper tilting. The testing is done after the physics simulation step. For this reason locomotion calculation has to be split into a part before physics simulation (during Element.think) and a part after physics simulation (during Element.postThink). Locomotion can be set to do no body tilt calculation, single or weighted. In single mode one collision test is used usually straight under the actor. The hit normal on the ground is used to calculate the tilting on a virtual plane located under the actor with the hit normal matching the plane normal. This is fast and for many situations reasonable solution. In weighted mode 4 collision tests are used each of them located near feet like if the actor is quadripedal (if not really the case). The image below shows the layout.
The results are weighted to get a best matching virtual ground plane. This mode is most expensive but the results are more stable and of higher quality. Once done the tilt result can be applied to animator instance controlls as any other locomotion state.
// set up locomotion body tilt for an actor using the weighted method
locomotion.setTiltMode( Locomotion.TILT_WEIGHTED )

// create collision filter shared by all tests
var LayerMask category = LayerMask.new()
category.setBit( GameState.CL_AI )      // we are an collider for doing actor ai

var LayerMask filter = LayerMask.new()
filter.setBit( GameState.CL_GEOMETRY )  // we can hit geometry like the ground
filter.setBit( GameState.CL_AI )        // we can hit other actor ai colliders

var CollisionFilter collisionFilter = CollisionFilter.new( category, filter )

// set collision test. the test points are located above the ground since otherwise tilting up can not
// be detected. as a rule of thumb the test distance should be two times the start height. for each
// test a ray test is used. this is the fastest solution and works well for most situations.
var float offset = 0.5                  // height above ground to start testing
var Vector testDistance = Vector.new( 0.0, -offset * 2.0, 0.0 )          // distance to test downwards

locomotion.setCCTTiltFrontLeft( ColliderCollisionTest.new( touchSensor, touchSensorShape, \
	collisionFilter, Vector.new( -0.2, offset, 0.2 ), testDistance ) )

locomotion.setCCTTiltFrontRight( ColliderCollisionTest.new( touchSensor, touchSensorShape, \
	collisionFilter, Vector.new( 0.2, offset, 0.2 ), testDistance ) )

locomotion.setCCTTiltBackLeft( ColliderCollisionTest.new( touchSensor, touchSensorShape, \
	collisionFilter, Vector.new( -0.2, offset, -0.2 ), testDistance ) )

locomotion.setCCTTiltBackRight( ColliderCollisionTest.new( touchSensor, touchSensorShape, \
	collisionFilter, Vector.new( 0.2, offset, -0.2 ), testDistance ) )

// add mappings so our animator uses the calculated values
locomotion.addControllerMaping( controllerTiltOffset, Locomotion.ATTR_TILT_OFFSET )
locomotion.addControllerMaping( controllerTiltUpDown, Locomotion.ATTR_TILT_UP_DOWN )
locomotion.addControllerMaping( controllerTiltLeftRight, Locomotion.ATTR_TILT_RIGHT_LEFT )

// tilt is enabled so during Element.postThink the tilt is updated automatically and the result
// applied to animator instance controllers
locomotion.updatePostLocomotion( elapsed )
State control and frame update
To update the locomomotion multiple calls are used. After the player has provided input the updateLooking() method can be used to smooth the input and to update the goal values used by the locomotion calculation step. Once the input is updated the locomotion can be calculated using updateLocomotion() method. This calculates all the needed locomotion states using native code. This call is used during Element.think(). After the physics simulation is done the updatePostLocomotion method can be called to calculate body tilting and potential other calculations requiring physics test results. Afterward the animation instance has to be updated if not assigned to be done by the locomotion instance directly.
If you want to enhance the locomotion class you have to be careful about the calling structure. The native classes methods call themselves internally for performance reasons. The entire late binding is skipped. Overwriting the update calls has no effect in this case. To partially change behavior you have to implement the updateLocomotion() and updatePostLocomotion() calls yourself and call the native methods from the script. This allows to inject your changes in the right place. This all works since it is no problem to call a method from script if it is a native class but the native class.
Player Input Tracker
To help with managing the player input for use with locomotions the DragonScript module provides a helper class PlayerInputTracker. This class is not mandatory but reduces implementation needs. The player input tracks what inputs the player has provided so far and calculates the goal locomotion changes my smoothing the changes over time using smooth values. Tracks digital input (pressing buttons like forward or strafing) as well as analog input (mouse, joystick axes). Call updateLocomotion() to smooth the input values and setting the appropriate goal values in a locomotion instance.


