Table of Contents
Start Page » DEMoCap: Drag[en]gine Motion Capture » Blender DEMoCap Tools Addon
Blender DEMoCap Tools Addon
The Blender DEMoCap Tools Addon simplifies the process of importing motion capture animations created by DEMoCap. Both free captures as well as exported captures are supported.
Installation
Blender 4.2 or newer
Using the new extension system in Blender search for “DEMoCap Tools” and install it. See the extension profile.
Blender 3.x
Install first the Drag[en]gine Blender Export Scripts. This Addon uses the import functionality of those scripts.
The addon scripts can be installed using the typical Blender3D workflow for installing addons.
You can download the zip file from: https://github.com/LordOfDragons/democap/releases/latest, file blender-democap-tools-*.zip where * is the version number.
Click the “Install” button and select the plugin zip file.
Once the plugins are installed the list shows the plugin. Click the check box to activate the plugin.
Now a new toolbox panel is added with the title “DEMoCap Tools”.
DEMCA Browser


DEMoCap saves captures using multiple files as outline in UI Panel Project -> Export. The *.deanim files can be imported directly. Besides these files a *.demca files is stored. This file contains informations about the capture session that produced this captured animation file. The *.demca file is an XML file and contains information like:
- Timestamp when capture has been done
- Path of *.deanim file created. The path is either relative to the democap capture directory or the project data directory depending on how the capture has been done.
- Playtime in seconds and framerate.
- List of bones captured
- Optional *.deanim and *.derig file for VR device captures if present
The DEMCA browser panel provides support to read those *.demca files and to import the contained resources easily.
The panel contains a file listing showing directories and *.demca files found in the current directory. After starting Blender or if you changed files on disk you have to press the Scan Files button to update the file listing. To switch directories press the left or right arrow button next to the directory list entry. To show information about a *.demca capture file select the file entry in the listing. The file information is read and displayed in the file information panel below. Use this panel to check if the motion capture contains the animation you would like to import.
Above the file listing are two buttons to jump to important directories.
The Captured button jumps to the captured animations directory in the DEMoCap capture directory. Free animations are stored into this directory. Free animations are captured if no Captured Character is selected while doing a motion capture. This is useful for doing quick captures like testing character configuration or doing motion captures that are not required to fit precisely into an existing environment. The directory is located here:
- Linux: ~/config/delauncher/games/e31f1c11-3ca6-c66b-adca-95484bedfc1f/capture/animations
- Windows: %AppData%\DELaunchers\Config\games\e31f1c11-3ca6-c66b-adca-95484bedfc1f\capture\animations
The Project button jumps to the project save directory in the DEMoCap config directory. Project files are stored in this directory or child directories thereof. This allows to manage project specific motion captures. For a project named {project}.demcp the project data is stored in a child directory named {project}-data. The *.demca files inside store path relative to this project data directory. This allows to import these files even after moving the project files. Exporting animations (including auto-exporting) stores files inside the project data directory. The directory is located here:
- Linux: ~/config/delauncher/games/e31f1c11-3ca6-c66b-adca-95484bedfc1f/config/projects
- Windows: %AppData%\DELaunchers\Config\games\e31f1c11-3ca6-c66b-adca-95484bedfc1f\config\projects
If you have a *.demca file entry select you can use the buttons below the file information panel to import animations.
Import Animation
Select an Armature that is compatible with the character contained in the motion capture. Press the button and wait for the import to be done. Depending on the playtime of the motion capture the importing can take a longer time to finish. Once the button is no more highlighted the import finished.
Import Devices Rig
This button can be used if the motion capture contains VR device capture information. Press this button to import the rig used by the motion capture to store the VR device input data. The bones in this rig are named after the VR device they represent. This import is quick and produces an Armature.
If multiple captures use the same VR device configuration you have to import this rig only once.
Import Devices Animation
This button can be used if the motion capture contains VR device capture information. Select the Armature imported by “Import Devices Rig” button. Depending on the playtime of the motion capture the importing can take a longer time to finish. Once the button is no more highlighted the import finished.
Import Object Rig
This button can be used if the motion capture contains object position and orientation information. Press this button to import the rig used by the motion capture to store the object parameters. The rig contains these bones:
- object: Represents the position and orientation of the object relative to the game world. You typically use a “Child of” constraint to attach the motion captured objects. Since Blender3D uses negative Y axis as forward direction for bones you have to set the Z Rotation of the attached object to 180 degrees to get the correct result.
- attach: Determines if the object is attached/grabbed at specific points in time. Only the local Y position is used. A local Y position of 0 represents not attached and 0.1 represents attached. As of DEMoCap 0.7 this value is not used yet.
This import is quick and produces an Armature.
If multiple captures use object position and orientation you can use the same rig layout but you have to duplicate the object since each attached object needs a unique parent.
Import Object Animation
This button can be used if the motion capture contains object position and orientation information. Select the Armature imported by “Import Object Rig” button. Depending on the playtime of the motion capture the importing can take a longer time to finish. Once the button is no more highlighted the import finished.
Correction Bones
The Correction Bones tools allows to post process motion capture data in a non-destructive way. Correcting bones has various uses, for example (including others):
- Correct actor poses to remove unwanted arching and rotating
- Fit motion capture pose to existing animations they are overlaying to get better looking blending
- Exaggerate or tone down motions
- Create variations of motions
Add Correction Bones
To use correction bones you have to first add them to your armature. Enter Pose Mode and select the bones to add correction support to then press the Add Rot or Add Rot+Loc button.
Correction bones are added directly to your armature to allow saving them into the actions as well as allowing them to be animated for fine control. The added bones are named “ik.mocap.{name}” where “{name}” is the name of the bone the correction applies to. To help organize bones the added correction bones are added to a bone group named “DEMoCap Correction”. The bone group is assigned the next unused color theme. The correction bones are assigned the same parent and transformation but are shortened in length to 65% of the original bone.
For each corrected bone a bone constraint is added using the respective correction bone as input.
If the Add Rot button has been used a Copy Rotation bone constraint is added. The bone constraint is set to superimpose the local rotation of the correction bone onto the original bone in local bone space. This means you can rotate the correction bones to rotationally offset the motion captured animation. Use this for all bones which require only rotation to be modified. This is the majority of bones.
If the Add Rot+Loc button has been used a Copy Transforms bone constraint is added. The bone constraint is set to superimpose the local rotation and translation of the correction bone onto the original bone in local bone space. This means you can rotate and mvoe the correction bones to rotationally and translationally offset the motion captured animation. Use this for all bones which require rotation and translation to be modified. This is typically used for location bones like the hip or origin bone where the location of the bone is important.
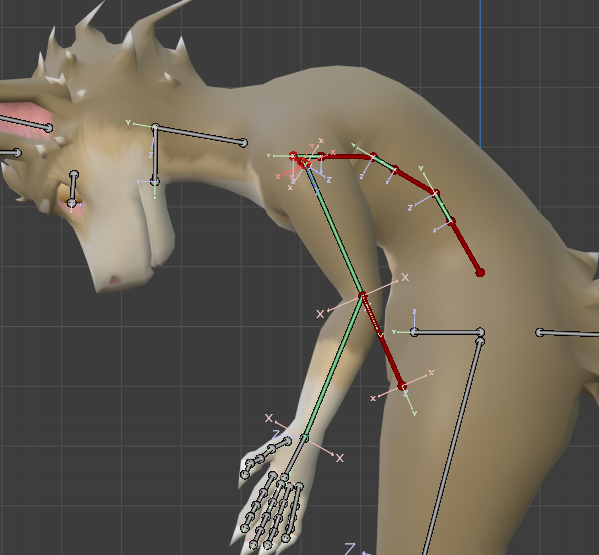
The image below shows the process of adding bones to the Dragonroo example character.

The image below shows how rotating spine correction bones offsets the animation without destroying it.
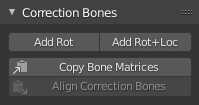
Align Correction Bones
If the motion captured animation is used by blending over an existing animation (for example an idle animation) then it is useful to align the animation to match as closely as possible the base animation at the beginning and end. This allows to blend into the motion captured animation with the highest quality.
To align correction bones activate the action and frame number to use as animation frame to match against. Select the correction bones to copy the original bone world space transforms for. It is also possible to select the respective original bones instead but selecting the correction bones is a faster workflow. With the bones selected click the Copy Bone Matrices button. The states are now stored in memory. Select now the motion capture action and go to the first frame to use. Select all correction bones you want to align. This is not required to be all the copied bones so you can apply the corrections in batches if you like. With the bones selected press the Align Correction Bones button. The correction bones are not rotated and optionally moved (if they have been added using Add Rot+Loc). After aligning the original bones match the rotation (and optionally location) of the copied world bone states. You can now add keyframes for the bones to the action.
The typical workflow to create overlay motion capture animations is to align the first and last frame to the base animation. Optionally add keyframes at 0.5-1s after the begin and before the end with the rotation and location cleared. This way the corrections ensure the animation fits well over the base animation when blended into while the clearing ensures the animation playes unmodified after being fully blended in.
It is also possible to the aligning to match specific time positions inside the animation to an existing animation.
The video below shows how this works. The imported animation is aligned to a base animation. Blending into the animation would produce good results like this. As an of altering the motion captured animation the spine is bend over causing the character to play the motion captured animation in a hunched over pose instead of the upright one as performed by the actor.
Copy Bone Matrices
Copies world matrix of all selected bones into copy buffer.
Copy Subtract
Copies world matrix of all selected bones and subtracts them from the bone matrices in the copy buffer. If a bone does not exist yet in the copy buffer it is copied instead. Hence after using Copy Bone Matrices and then (for the same selected bones but in a different animation pose) Copy Subtract stores in the copy buffer the difference between the two poses. This is useful to apply the difference between two poses to a third pose.
Paste Bone Matrices
Paste bone matrices in the copy buffer to the selected bones. If a bone has no matching matrix in the copy buffer nothing is done. This operator has two parameters:
Overlay
If ticked the bone matrices from the copy buffer are overlaid instead of replacing the selected bone world matrices. Overlaying allows to apply the difference between two poses stored in the copy buffer using Copy Bone Matrices and Copy Subtract on top of the current pose.
Negate
If ticked and Overlay is also ticked overlays the copy buffer pose in reverse. Hence instead of adding the copy buffer matrices to the current pose it is subtracted.
