Table of Contents
Start Page » DEMoCap: Drag[en]gine Motion Capture » Prepare Character for Motion Capture (Blender3D)
Prepare Character for Motion Capture (Blender3D)
The first step for doing successful motion capture with DEMoCap is to prepare your character model in Blender3D or any other 3D application able to export into a 3D format supported by Drag[en]gine.
DEMoCap does not alter the armature/skeleton used for your character. To do this though it requires you to create a few animations each consisting of single animation frame. This page outlines the used animations and how to create them. You can name the animations whatever you like. Export all animations into a single animation file. You can then assign this animation file in the Edit Character dialog.
Calibration Pose

The calibration pose has to match as closely as possible the T-Pose stroke by the motion capture actor during calibrating. Many characters are designed by artists in a T-Pose or A-Pose. In this description we assume a T-Pose character as base character.
Arms and legs have to be placed at 90 degrees and thus point straight to the side respectively to the ground. They have to be straight not bend.
T-Pose characters are typically designed with the palms facing downwards. Motion capture actors though calibrate with palms facing forward. In this pose the arms are rotated differently than T-Pose characters typically have. Rotate the upper arm to face 60 degrees upwards and the lower arm to face an additional 30 degrees upwards. The palms should now face forward as if the character is about to grab a VR controller.
Using 60/30 degree rotation is one way to set up the character. Another is using 45/45 degree rotation distribution. Using the more even rotation distribution can be useful for characters having problematic vertex weighting at the elbow area. If in doubt try first the 45/45 degree rotation distribution and switch to 60/30 if the results are better.

Fingers have to be straight not bend. The amount of splay between the fingers is not important.
Knees and feet have to face forward. Feet can optionally be rotated along the Y axis but it is recommended to align forward for easier calibration.
Spine has to be straight upwards. The head should be above the waist and feet. In general make the character stand straight upright. If the character is hunched over this can be done using motion transfers later on dynamically.
Base Inverse Kinematics (IK) Pose
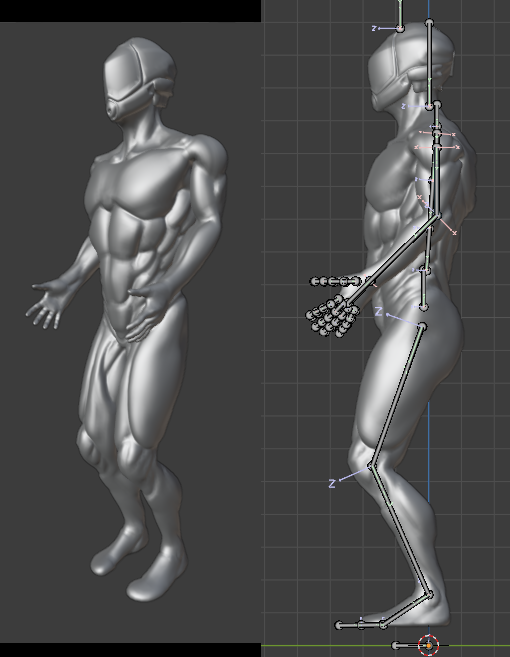
The most important motion transfer used for motion capture is the Inverse Kinematics (IK) motion transfer. IK in general has troubles to calculate good poses if the limbs start out in straight pose as done in the calibration pose above. It is thus highly recommended to create a base pose to use before applying inverse kinematics to get the best result.
The image above shows how the actor should best look like.
Start with a copy of the calibrate pose.
Keep the waist/hip bone at the same location as with the calibrate pose. It is correct if the feet do not touch the ground.
Arms and legs should be lightly bend. For the knees angles of 10-20 degrees are fine. For elbows 45 degrees are recommended. Rotate the upper arm bone downwards or half-way downwards (A-Pose) and twist it to make the arm point forward.
The Auto Human motion transfer uses the elbow trackers if present to orientate the upper arm bone. In this mode of operation the orientation of the upper arm bone is not important but for all bones below it orientation is important. Rotating the upper arm as mentioned above is not required for this mode of operation.
If no elbow trackers are used the orientation of the upper arm bone though is important for the inverse kinematics to work. In this mode of operation rotating the upper arm bone into the appropriate position is required to get acceptable results. Since using elbow trackers does not care about upper arm orientation it is recommended to apply the orientation to allow both modes of operation to be used at the same time.
It is up to you if you want to rotate the upper arm bone fully downwards or half-way down into an A-Pose. Rotating the bone all the way down achieves better results with movements where the arm is kept in a lowered position while the A-Pose works better for arms mostly held in a raised position. Using elbow trackers does not care about your choice here.
The tutorial video below shows how to best achieve the arm pose with the arm fully rotated downwards. For the A-Pose version rotate the arm back up 45 degrees after the end pose shown in the video.
A good starting point is placing the arms facing downwards first. If no elbow trackers are used this pose can cause some characters to slightly twist the elbow inwards. By raising the arms by 20-30 degrees (front view) this can be improved. With some characters it might be even necessary to raise the arms up to 45 degrees.
In general raising the arms tends to add some twist to the lower arm. That said without using elbow trackers you usually can only get one range of pose working properly: down/forward for conversations or up/forward for fighting stances. If you need both create two Configurations each using a different Base IK Animation to optimize the results.
Hands Closed Pose

Start with a copy of the calibrate pose.
This animation frame defines the finger and hand pose of the character curling his hands into a fist or grabbing an object. You can create multiple animations and use different character configurations if you need to support different scenarios.
Crouch Pose

The crouch pose animation is optional and helps to obtain better results for leg inverse kinematics. Using the distance of the waist above the ground the crouch pose is blended over the base ik pose to achieve a better starting pose for crouching. This is typically used for beast type legs which are tricky to move into crouching pose with inverse kinematics only.
Start with a copy of the calibrate pose.
Keep the waist/hip bone at the same location as with the calibrate pose. It is correct if the feet do not touch the ground.
Legs should be bend strongly as if the character is doing a low crouch. Extreme pose is okay here, especially for beast type legs. If you can not define a sane crouch pose here the motion capture is not going to achieve good results either.
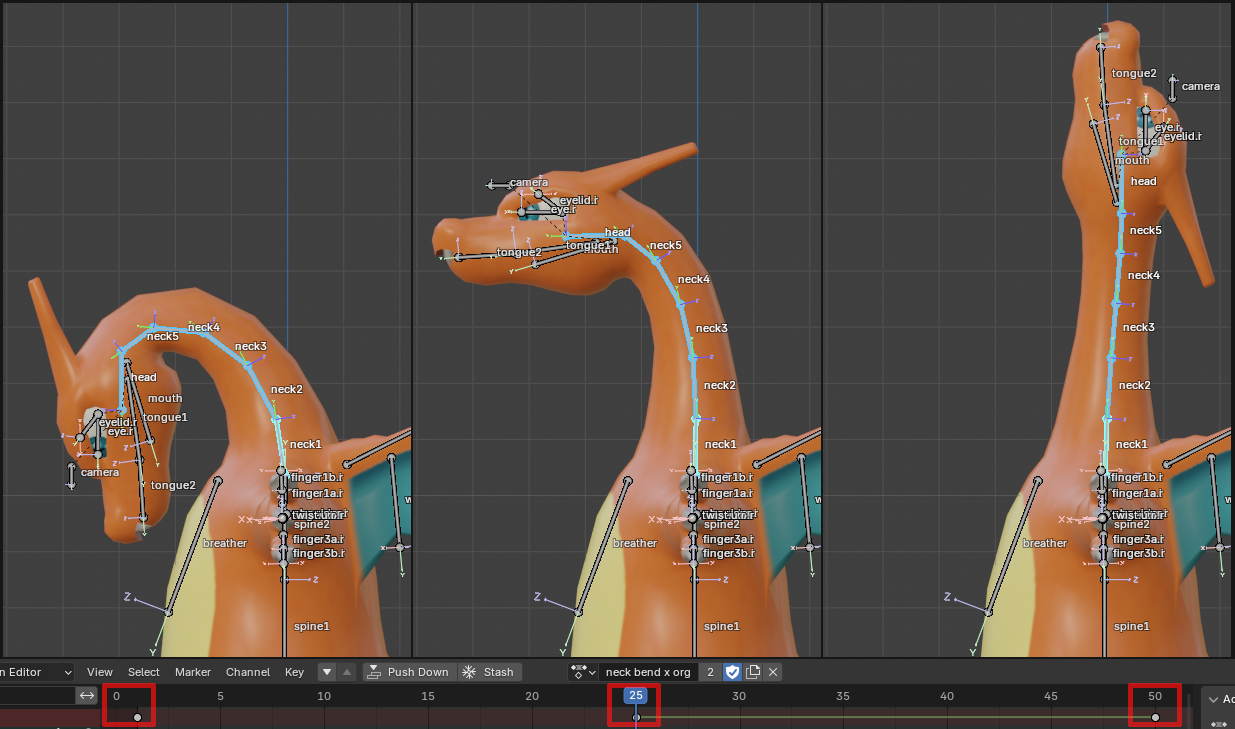
Looking Up-Down
For beast type characters with long necks it is useful to define the up and down looking animation to get artistic control over how the head movement performed by the actor is mapped to the character. For this create an animation action with these 3 poses: looking down (left end of the animation), neutral looking ahead (middle of the animation) and looking up (right end of the animation). Using 50 frames in total is usually enough for this. It is recommended to use linear interpolation between the poses since DEMoCap maps the up-down looking angle to the animation frame time. In some situations though it might help to choose a different interpolation. It is also a good idea to set the channel to linear extrapolation. If constant extrapolation is used (the default) Blender has the tendency to smooth out the motion towards the border of the animation which can have negative effect. By using linear extrapolation this is prevented.
The image below shows how this animation looks like for a typical long neck character.
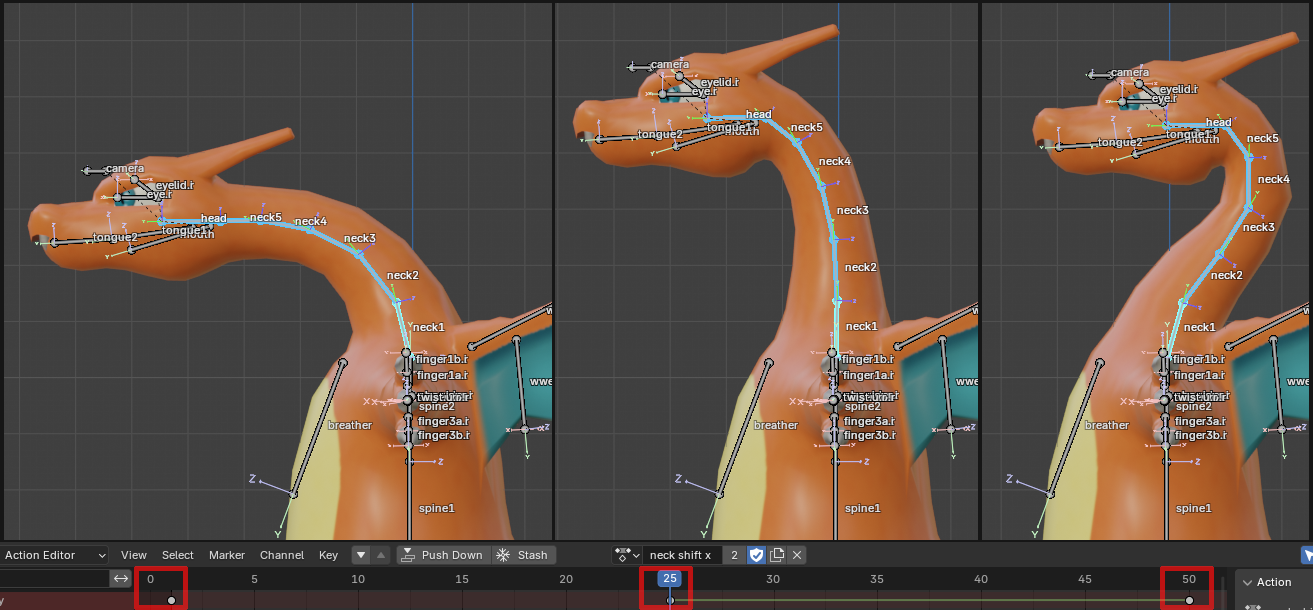
Shift Head Forward-Backward
For all kinds of characters using a shift head forward-backward animation allows DEMoCap to capture actor head shifting forward-backward to apply it to the character. Since it is difficult for DEMoCap to predict how such a motion looks like for an actor it is required to create an animation for this if desired to be captured. For this create an animation action with these 3 poses: shift head forward (left end of the animation), neutral looking ahead (middle of the animation) and shift head backward (right end of the animation). Using 50 frames in total is usually enough for this. It is recommended to use linear interpolation between the poses since DEMoCap maps the up-down looking angle to the animation frame time. In some situations though it might help to choose a different interpolation. It is also a good idea to set the channel to linear extrapolation. If constant extrapolation is used (the default) Blender has the tendency to smooth out the motion towards the border of the animation which can have negative effect. By using linear extrapolation this is prevented.
The image below shows how this animation looks like for a long neck character. The same applies to normal characters just with head/neck bone modified.
Side Effects With Bending
Using shift head forward-backward animation and looking up-down animation together can yield results which might not be as you expect them to be. The reason is that when looking up your head will also do some shifting which DEMoCap will detect. As a result looking up will usually be a combination of the looking up-down animation and the shift head forward-backward animation. To counter this you have to subtract a certain amount of head shift forward-backward from the looking up-down animation to get exactly the result you want to. To do this you best use the Blender DEMoCap Tools: Copy Bone Matrices and company operators.
First make a copy of your look up-down animation and rename it to something like “look up-down modified” or similar. This animation is going to be the one to use if both looking up-down and shift head forward-backward is used. Usually it is enough to just modify the looking up pose but correctly the looking down pose would need a correction too, albeit a lesser one.
- Switch to your shift head forward-backward action.
- Select the frame in the middle where your character is in neutral pose.
- Select all neck bones and the head bone to modify.
- Click
Copy Bone Matricesto copy the pose. - Select the frame where your character is shifting head forward by roughly 75%.
- Click
Copy Subtract. You have now the difference stored in the copy buffer. - Switch to your looking up-down action.
- Select the frame at the right end where your character is looking up.
- Click
Paste Bone Matricesand make sure that in the operator panelOverlayandNegateare ticked. - Press
Kto add rotation keyframes.
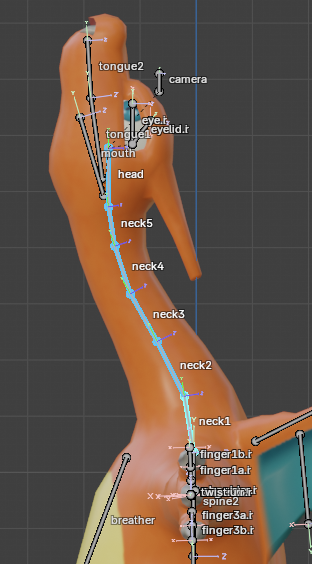
Copy Subtract stores the rotation from the stored bone matrices to the to-copy bone matrices. Hence the bone pose stored above is the rotation from the neutral pose to the look forward pose. This is then subtracted (Negate) from the look up pose. This can be also double inverted to do it slightly differently with the same result. Select first the shift forward frame then the neutral frame and untick Negate while pasting.
The animation frame should now looking similar to the image on the right side.
It looks a bit strange but if this animation frame is combined with shifting head forward (as happens if you look up) then the result will be the looking up pose you started out with.
You have now the animation adjusted. Export the animations and in the motion transfer select this new animation as Neck Bend X Move.
How much of the head shifting to subtract depends on the actor. In general the rule of thumb is to subtract 75% of shift head forward from the looking up pose and 50% of shift head forward from the looking down pose. As mentioned the looking done pose is often not required to be modified but it can be done to optimize the results.
