This is an old revision of the document!
Table of Contents
Start Page » DEMoCap: Drag[en]gine Motion Capture » Blender DEMoCap Tools Addon
Blender DEMoCap Tools Addon
The Blender DEMoCap Tools Addon simplifies the process of importing motion capture animations created by DEMoCap. Both free captures as well as exported captures are supported.
Installation
Install first the Drag[en]gine Blender Export Scripts. This Addon uses the import functionality of those scripts.
The addon scripts can be installed using the typical Blender3D workflow for installing addons.
You can download the zip file from: https://github.com/LordOfDragons/democap/releases/latest, file democap-tools-*.zip where * is the version number.
Click the “Install” button and select the plugin zip file.
Once the plugins are installed the list shows the plugin. Click the check box to activate the plugin.
Now a new toolbox panel is added with the title “DEMoCap Tools”.
DEMCA Browser
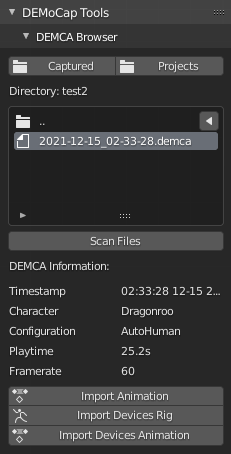
DEMoCap saves captures using multiple files as outline in UI Panel Project -> Export. The *.deanim files can be imported directly. Besides these files a *.demca files is stored. This file contains informations about the capture session that produced this captured animation file. The *.demca file is an XML file and contains information like:
- Timestamp when capture has been done
- Path of *.deanim file created. The path is either relative to the democap capture directory or the project data directory depending on how the capture has been done.
- Playtime in seconds and framerate.
- List of bones captured
- Optional *.deanim and *.derig file for VR device captures if present
The DEMCA browser panel provides support to read those *.demca files and to import the contained resources easily.
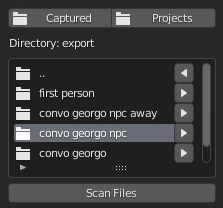
The panel contains a file listing showing directories and *.demca files found in the current directory. After starting Blender or if you changed files on disk you have to press the Scan Files button to update the file listing. To switch directories press the left or right arrow button next to the directory list entry. To show information about a *.demca capture file select the file entry in the listing. The file information is read and displayed in the file information panel below. Use this panel to check if the motion capture contains the animation you would like to import.
Above the file listing are two buttons to jump to important directories.
The Captured button jumps to the captured animations directory in the DEMoCap capture directory. Free animations are stored into this directory. Free animations are captured if no Captured Character is selected while doing a motion capture. This is useful for doing quick captures like testing character configuration or doing motion captures that are not required to fit precisely into an existing environment. The directory is located here:
- Linux: ~/config/delauncher/games/e31f1c11-3ca6-c66b-adca-95484bedfc1f/capture/animations
- Windows: %AppData%\DELaunchers\Config\games\e31f1c11-3ca6-c66b-adca-95484bedfc1f\capture\animations
The Project button jumps to the project save directory in the DEMoCap config directory. Project files are stored in this directory or child directories thereof. This allows to manage project specific motion captures. For a project named {project}.demcp the project data is stored in a child directory named {project}-data. The *.demca files inside store path relative to this project data directory. This allows to import these files even after moving the project files. Exporting animations (including auto-exporting) stores files inside the project data directory. The directory is located here:
- Linux: ~/config/delauncher/games/e31f1c11-3ca6-c66b-adca-95484bedfc1f/config/projects
- Windows: %AppData%\DELaunchers\Config\games\e31f1c11-3ca6-c66b-adca-95484bedfc1f\config\projects
If you have a *.demca file entry select you can use the buttons below the file information panel to import animations.
Import Animation
Select an Armature that is compatible with the character contained in the motion capture. Press the button and wait for the import to be done. Depending on the playtime of the motion capture the importing can take a longer time to finish. Once the button is no more highlighted the import finished.
Import Devices Rig
This button can be used if the motion capture contains VR device capture information. Press this button to import the rig used by the motion capture to store the VR device input data. The bones in this rig are named after the VR device they represent. This import is quick and produces an Armature.
If multiple captures use the same VR device configuration you have to import this rig only once.
Import Devices Animation
This button can be used if the motion capture contains VR device capture information. Select the Armature imported by “Import Devices Rig” button. Depending on the playtime of the motion capture the importing can take a longer time to finish. Once the button is no more highlighted the import finished.


