Table of Contents
Start Page » DEMoCap: Drag[en]gine Motion Capture » Modding
Modding
DEMoCap supports modifications developer by anybody using the Mod.io platform. Various modifications can be made including (but not limited to): characters, props, worlds and script code.
Examples
Example modifications can be found on the Github Repository.
Using Modifications
Users can browse, install and uninstall modifications using the “Modifications” button in the Settings Panel.
Create Modifications
Modifications are .zip archive files containing the files the modification adds to DEMoCap. In DEMoCap all files are located in either the content or scripts directory. For all kinds of modifications not requiring new script code content is added to the content directory. If you need to create script code, for example to add new object classes, then you have to add them to the scripts directory.
Once you have created the .zip file you can upload it to the Mod.io platform for others to use.
Develop/Test Modifications
To develop and test modifications you can use the following process. This process makes mod creation organized for you.
Project Preparation
Start by creating in your home directory a new directory for your project. For this example let's assume it is named MyMod. Inside this directory create the directory content. Inside this directory you can now place your content files for your modification. If you don't need scripts for your modification you can skip to Prepare Testing.
If you want to create scripts for your modification you also have to create the directory scripts inside the MyMod directory. You have then side by side the content and scripts directory.
For developing scripts it is recommended to use Visual Studio Code. Start it up and open the Extension panel (the one with the 4 cubes icon). Search for DragonScript and install the DragonScript Language Support. This adds support to easily edit DragonScript files with complete project management.
DragonScript used in the Drag[en]gine Game Engine does not require compiling, bundling or otherwise process scripts before using them. Visual Studio Code and the DragonScript extension are only required to simplify and accelerate writing scripts. To run your scripts you can just launch DEMoCap with them as-is.
You have now an empty workspace. Start by clicking on File → Add Folder to Workspace. Select your MyMod directory. You have now a workspace with the two directories content and scripts.
Now you have to activate Drag[en]gine Game Engine support for your project. Open the Settings panel (press shortcut CTRL+, or click the gear icon and select Settings). Write DragonScript in the search box and select Workspace.
Place a tick next to Requires Package Drag[en]gine. This makes the base game engine script package available to the project.
Under Script Directories click on Edit in settings.json. This creates and opens the settings file in your project placing the cursor at the dragonscriptLanguage.scriptDirectories setting. Replace the “.” value with “scripts” value. This ensures script parsing is only done on the scripts directory and not the entire project. Go back to the Settings tab.
Under Base Packages click on Edit in settings.json. This opens again the settings file placing the cursor at the dragonscriptLanguage.basePackages setting. Here you can enter the *.delga file of DEMoCap. This will make the DEMoCap script files available in the project. To find the correct path you can launch from the start menu Drag[en]gine GUI Launcher. On Linux you can also run delauncher-gui from a terminal window. Find the DEMoCap game entry in the list and RMB click on it. Select Properties. In the dialog window locate the DELGA: value. This is the path to the last known location of DEMoCap. Copy this path and enter it into the dragonscriptLanguage.scriptDirectories list.
On Windows make sure to replace each single \ in the path with double \\. Otherwise the directory will not be found and you miss IDE support for DEMoCap script classes.
Once done your settings file looks similar to this:
{
	"folders": [
		{
			"path": "."
		}
	],
	"settings": {
		"dragonscriptLanguage.requiresPackageDragengine": true,
		"dragonscriptLanguage.scriptDirectories": [
			"scripts"
		],
		"dragonscriptLanguage.basePackages": [
			"/home/dragondreams/.steam/steam/steamapps/democap/DEMoCap.delga"
		]
	}
}
You can also manually create and edit this file and the content of it. This can be useful if you create multiple modifications by copying the content of this file.
Your workspace is now ready to developer the modification using scripts.
Prepare Testing
You can easily test your modification while developing with these steps depending on the operating system you are using.
Linux
Open file browser with path ~/.config/delauncher/games/e31f1c11-3ca6-c66b-adca-95484bedfc1f. Create directory overlay. Content in this directory will be overlaid in DEMoCap. Open the overlay directory. Open your MyMod directory in another file browser. Create symbolic links of content and scripts into the overlay directory.
Now when you run DEMoCap your modification content will be used as if a user has installed your final modification.
Windows
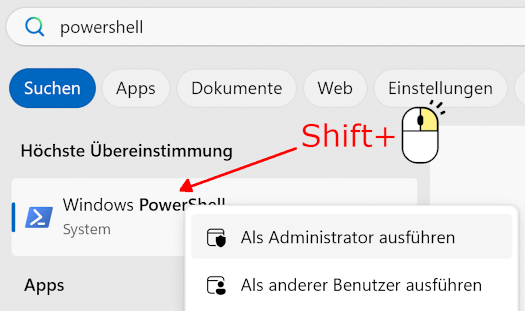
Open Powershell. If you are on Windows 10 you have to run the powershell with administrator privileges. On Windows 11 you can run powershell as normal user. To run powershell as administrator search for Powershell in your start menu and RMB click on it and select Run as Administrator.
In the powershell window enter these commands:
New-Item -ItemType Directory -Force -Path "$env:APPDATA\DELaunchers\Config\games\e31f1c11-3ca6-c66b-adca-95484bedfc1f\overlay"
New-Item -Path "$env:APPDATA\DELaunchers\Config\games\e31f1c11-3ca6-c66b-adca-95484bedfc1f\overlay\content" -ItemType SymbolicLink -Value C:\Users\DragonDreams\MyMod\content
New-Item -Path "$env:APPDATA\DELaunchers\Config\games\e31f1c11-3ca6-c66b-adca-95484bedfc1f\overlay\scripts" -ItemType SymbolicLink -Value C:\Users\DragonDreams\MyMod\scripts
Replace C:\Users\DragonDreams\MyMod with the path to your MyMod directory. These calls create first the overlay directory. Then the content and scripts directories from inside your MyMod directory are symbolic-linked to the overlay directory.
Now when you run DEMoCap your modification content will be used as if a user has installed your final modification.
Once you are finished developing your modification remove these two symbolic links (content and scripts directories). Otherwise they keep overlaying DEMoCap even if you test-install your own modification after uploading it to Mod.io.
Content Modifications
See the DEMoCap repository for the kind of files you can add.
Script Modifications
See the DEMoCap repository for the kind of scripts you can add.
In general the scripts you write need to be added at the right time while DEMoCap is loaded. This is done by creating a modification script file in your project. Create a file ModTestScript.ds in your project. The name of the file is not important as long as the extension is .ds. Add the following content to the file:
namespace Democap.Modifications
pin MyModification

class ModTestScript extends Modification
	func new()
	end
end
The namespace line is important. DEMoCap searches for modification script files only in this namespace.
Use for MyModification a unique namespace name for your modification to keep files from mixing with other modifications. Place your script files in this namespace. You can choose your file structure as you like. It is not required to mirror namespace structure but doing so can help organize your files.
To add your script files to the right location you have to override the corresponding method in your ModTestScript file. You can enter some newlines below the constructor (function new) then press CTRL+Space to show completion suggestions. Select for example override createAndAddElementClasses to insert the function. In this example the function allows to add your own element classes. This can be for example a new type of object a user can add to his motion capture world.
Adding createAndAddElementClasses this can potentially look like this:
namespace Democap.Modifications
pin Dragengine.Scenery
pin MyModification

class ModTestScript extends Modification
	func new()
	end

	func void createAndAddElementClasses(GameApp app)
		app.getElementClassList().add(MyCoolObjectClass.new())
	end
end
You then would have to add a new script file implementing the MyCoolObjectClass. See DEMoCap internal element classes for examples on how they are structured.
Pay attention to the Problems panel in Visual Studio Code. If errors are shown DEMoCap will fail launching. If you have no errors shown you can launch DEMoCap and your modification will be loaded. No compiling of any kind is required. DEMoCap loads the scripts as is during starting up.
Once your modification is working as intended you can create the .zip archive and get ready to publish it on Mod.io.
If you need support join our Discord channel.
Happy modding.
