democap:tutorialcreatecharacter
Start Page » DEMoCap: Drag[en]gine Motion Capture » Tutorial: Create Character
Create Character
How to set up character on the example of Biomech character:
Main Menu:
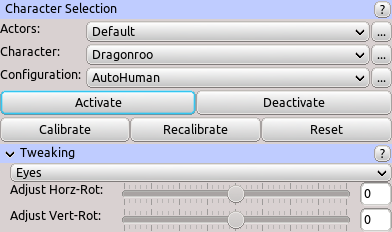
- click on … button next to Character combo box.
- Click Add Character and give it a name.
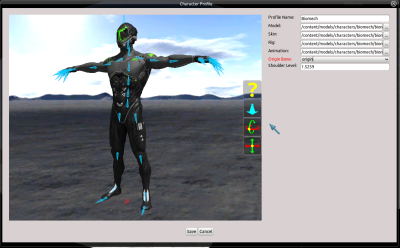
Character Profile Dialog:
- Click again on … button and click on Edit Character.
- Click on the … buttons to select model, skin, rig and animation from the /content/models/characters/biomech directory.
- Click on Origin Bone.
- In the 3D view locate the origin bone and click it to set it. It is located between the feed. Hover over the bones to see their names. Use right mouse button to navigate (rotate, +shift pan, +control zoom). You can also write the bone name into the combox or select the bone from the dropdown list.
- Click on Shoulder Level.
- In the 3D view click the red up arrow and drag the plan upwards until it lines up with the shoulder. use the base of the upper arm bone not the clavicle bone otherwise the scaling is off.
- Click Save button at the bottom to save the character profile and close the dialog.
Main Menu:
- Click on … button next to Configuration combo box.
- Click Add Configuration and give it a name.
- Click again on … button and click on Edit Configuration.
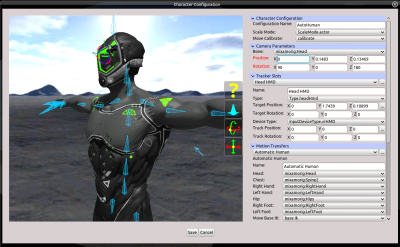
Character Configuration Dialog:
Read first Tracker Slot Placement. This contains up to date information on how to best place tracker slots. This information supersedes information below if contradicting.
- In group Character Configuration in the Move Calibrate combobox dropdown list select calibrate. This animation move has one single frame and is used to line up the character with the actor (yourself in this situation).
- In group Camera Parameters click on Bone.
- In the 3D view locate the mixamorig:Head bone and click it to set it.
- Click on Position underneath Bone to place the camera relative to the selected bone.
- In the 3D view use the red, green and blue arrows to move the coordinate system where the eyes are. Your HMD view camera will be placed here. Use the rotation arcs to line up the Z axis (the blue arrow) with the viewing direction (aka pointing forward as seen from the character) and the Y axis (the green arrow) with the up direction (aka pointing up as seen from the character).
- Once done you can fine tune the values in the edit fields for example to snap them to straight angles. In this example the rotation you have to use is x=90, y=0 and z=180.
- In group Tracker Slots click on … button next to the combo box and click Add 10-Tracker Slots. This will add default slots suitable for up to 10 tracker usage (head, waist, hands, ellbows, feet, knees).
- Select tracker slot Right Hand Controller.
- Click on Target Position.
- In the 3D view move the coordinate system between finger base and thumb base in the middle of the hand. Fine tune this position later if the hand movement is not satisfactory.
- Click the … button on the line labelled Track Position and click on Index Controller. This will fill in default offset value for use of Index Controller. You could also instead adjust the coordinate system position but it is easier this way.
- Select tracker slot Left Hand Controller.
- Click the … button on the line labelled Target Position and click Mirror from opposite slot. This avoids doing work twice.
- Click the … button on the line labelled Target Position and click on Index Controller.
- Select tracker slot Right Foot.
- Click on Target Position.
- In the 3D view move the coordinate system to the back of the foot. Adjust this position if the foot does not line up with the ground using trackers.
- Select tracker slot Left Foot.
- Click the … button on the line labelled Target Position and click Mirror from opposite slot.
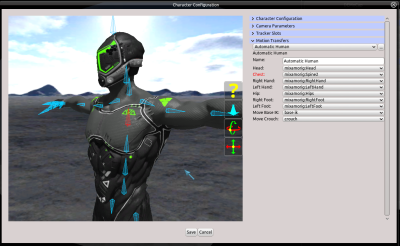
- In group Motion Transfers click on … button next to the combo box and click Add Transfer. In the dialog select Automatic Human and click Accept. This motion transfer takes care of complex setup by providing a few simple parameters.
- Assign all bones. For this click on each bone label and in the 3D view locate the matching bone and click on it. Use these bones:
- Head: mixamorig:Head
- Chest: mixamorig:Spine2
- Right Hand: mixamorig:RightHand
- Left Hand: mixamorig:LeftHand
- Hip: mixamorig:Hips
- Right Foot: mixamorig:RightFoot
- Left Foot: mixamorig:LeftFoot
- Select moves used to improve capture results. Select move base ik for Move Base IK and move crouch for Move Crouch. This is optional but improves the result.
Optional Finger Tracking:
This is the most basic motion transfer setup. Optionally you can add transfers to get finger tracking if you have Index Controllers:
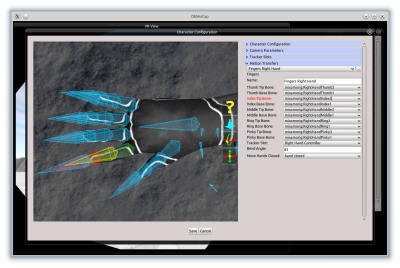
- In group Motion Transfers click on … button next to the combo box and click Add Transfer. In the dialog select Fingers and click Accept.
- Change the name of the motion transfer to Fingers Right Hand.
- Assign finger bones. Use as base the bones named mixamorig:RightHand{finger}1 and as tip the bones named mixamorig:RightHand{finger}3 where {finger} is Thumb, Index, Middle, Ring and Pinky.
- Select Right Hand Controller as Tracker Slot.
- Select hand closed as Move Hands Closed. This is optional but improves quality.
- Repeat this process to add a second Fingers motion transfer for the left hand.
Finish Character: Click Save button at the bottom to save the character configuration and close the dialog.
You could leave a comment if you were logged in.
democap/tutorialcreatecharacter.txt · Last modified: 2022/01/31 18:24 by dragonlord

