Table of Contents
Start Page » Game Development with the Drag[en]gine » Drag[en]gine Integrated Game Development Environment » Conversation Editor
IGDE Conversation Editor
The conversation editor is used to create conversation resources for your game. These are *.deconvo files defining how a complex dynamic conversation unfolds.
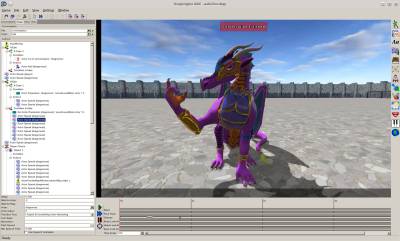
The editor window is composed of the preview area, properties panel on the left side and the dope sheet at the bottom of the window.
Preview Window
The preview window shows a preview of the conversation and this can be done in three different camera modes: conversation, camera view and free.
The free camera is the default and with it, the user is completely free to move around in a scene. See 3D-View Navigation on how to navigate the view using this mode.
The camera shot mode shows the currently selected in-game camera. This allows to set up new camera shots as well as previewing camera shots before deciding which one to use.
The conversation camera shows the conversation as seen in the game. Each time a camera shot action is encountered the conversation camera is switched and animated. When playback starts the camera is automatically switched to the conversation camera.
The actor sub-titles are shown at the bottom of the preview window. This is a generic preview subtitle setup and does not reflect how subtitles appear in the game (depends on script code and GUI themes used). This box shows the subtitle line of the last actor speak action that has been processed. Once the display time elapses the sub title is cleared.
The command box is shown at the top of the preview view. If a game command or actor command is encountered the command is shown in this box and playback is paused. To continue playback press MOUSE_LEFT anywhere in the preview view or press SPACE.
To help frame actors better you can enable the rule of thirds overlay from the view menu. This is a set of transparent dotted lines superimposed on the view dividing it into 9 equally sized cells. A rule of thumb for better framing is to align the focal points of actors (their eyes) with one of the crossing points.
Conversation Panel
Targets
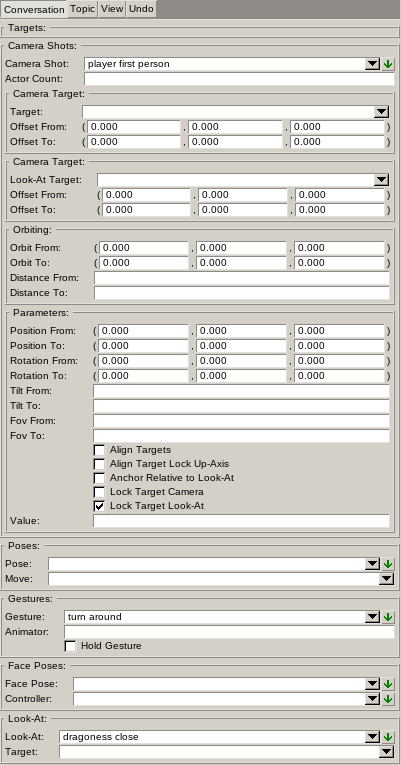
Targets are used in different places in the conversation to define a point in space. They are identified using a unique identifier. Targets have a Position and Orientation relative to the target. The orientation is applied before the position. Targets are relative to a Conversation Actor or a Coordinate System.
Using an Actor Index or Actor Name (matching either Unique Name or Alias Name) the target is relative to a conversation actor. The actor has to be present in the conversation for this target to work. If the actor is missing the position is set relative to the game world. If Bone is used the target position is relative to the specified bone in the actor. The name of the bone has to match the name of a bone in the Rig used in the actor in the game world. The game scripts can though apply a different logic to the meaning of the bone parameter for example using it as a type name to target a specific area on an actor. If the bone name is not understood by the game scripts the actor location is used as if no bone has been specified.
Using a Coordinate System Identifier (matching either Identifier or Alias Identifier) the target is relative to a conversation system. The conversation system has to be present in the conversation for this target to work. The Bone parameter is ignored for coordinate system targets.
Camera Shots
Camera shots define parameters for dynamic camera handling while active. Camera shots are identified using a unique identifier. They modify the Conversation Camera behaviour over the duration of their shot. Various camera parameters can be set. Each parameter has a Start and End value. During the camera shot the parameter is linearly interpolated between the start and end value. Once past the duration the parameters stay at the end value. The following parameters are supported:
- Camera Offset: Offset of camera relative to camera mount point. This is called the Orbit Center.
- Camera Distance: Distance of camera backwards from orbit center. Defines the radius of the sphere the camera orbits around at.
- Orbit Rotation: Rotation of camera around orbit center. This is called the Camera Center.
- Look-At Offset: Offset of look-at point relative to look-at target. This is called the Look-At Center.
- Rotation: Rotation relative to camera center.
- Position: Position relative to camera center. Applied after Rotation.
- Tilt: Tilt of camera relative to camera center. Tilt is applied around the camera view angle. This is called in cinematics a Dutch Angle or Dutch Shot.
- FOV: Field of view of camera. Using different end value than start value can be used for special effects.
The Camera Shot Action defines the Targets used as camera target (gives the camera mount point) and look-at target. There are some additional parameters to alter this behaviour:
- Align Targets: The camera and look-at targets are virtually aligned to face each other before doing camera calculations. This ensures a camera faces towards the other target even if the actual targets face somewhere else.
- Lock Up Axis: Locks the Up-Axis while Align Targets is used. This prevents the camera from altering the elevation only the aziumth.
- Relative To Look-At: The camera mount point is relative to the look-at target instead of the camera target. This helps to place cameras at a specific location relative to a target actor but still changing the view direction depending on some other target.
- Lock Camera Target: Evaluates the camera target only at the beginning of the camera shot. This prevents the camera following target movement to get steady shots.
- Lock Look-At target: Evaluates the look-at target only at the beginning of the camera shot. This prevents the camera following target movement to get steady shots.
Look-Ats
Defines a look-at usable in the conversaion. Look-Ats are identified using a unique identifier. Each look-at defines the Target it is using. Different look-at can point to the same target.
Face Poses
Defines a face pose to use on actors. Face poses are identified using a unique identifier. Each face pose has a set of Controllers indicating the blending of different facial states.
Gestures
Defines a gesture to use on actors. Gestures are identified using a unique identifier. Each gesture has an Animator Identifier to be send to the game script to pick the right animator for use by this gesture. The interpretation of the animator identifier is game specific. The optional Hold parameter can be used to hold the gesture after the duration. If not set a gesture finishes after the duration it is played over. Using hold is required to create looping gestures that can be held until another gesture blends over it.
Topic Panel
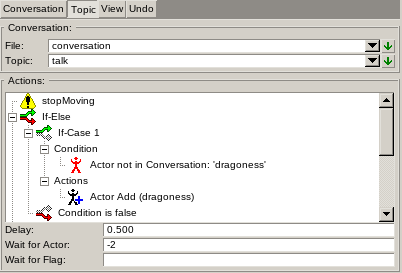
Conversation resources compose of a list of Topic Groups. Topic groups allow to organize conversations in a conversation file by groups of related topics. The developer can name the groups whatever fits his purpose. Each topic group then contains a list of Topics.
A topic is the actual conversation script played back by the game engine. Topic groups can have any number of topics. Conversation scripts are similar to movie scripts. They compose of Conversation Actions played back one after the other. In contrary to timeline based approaches the movie script based approach allows for better control of dynamic conversations where the actual length and spacing between actions can vary. Furthermore it makes modifying conversations easier since no re-timing or re-aligning along a timeline is required.
Conversations can play back with any number of Conversation Actors attached to the conversation. Actors can be added and removed any time during the conversation. Only limitation is that an in-game actor can be only attached to one running conversation at all times. If you need to control actors from different conversation scripts use Game Command actions. Conversation actors are identified in the conversation script either using their index (first actor is actor 0, second actor is actor 1 and so forth) or using one of their names. Each conversation actor is required to have a unique name which never changes. In addition while adding a conversation actor an Alias Name can be assigned. This allows to identify a conversation actor in the conversation script by a pre-defined name no matter what actor is attached to this alias name in the end. A typical example is to add the conversation partner actor always with the alias “npc” no matter what kind of NPC the player talks too. Otherwise you would have to deal with all possible unique conversation actor names. Using alias names is recommended. Unique names is best used to identify a specific unique actor. Actor indices are not recommended.
Conversation resources are no engine resources. See the scripting language of your choice for how to load and use a conversation resource in your game.
Conversation Actions Conversation actions provide the basic steps in a conversation script. For details see the Conversation Actions page.
Conversation Conditions Conversation conditions provided support to evaluate a composed condition for use in branching actions. For details see the Conversation Conditions page.
Paste Conversation Snippet
In the MOUSE_RIGHT context menu you can select Paste ConversationSnippet to quickly insert conversation actions. This opens a dialog to enter the information.
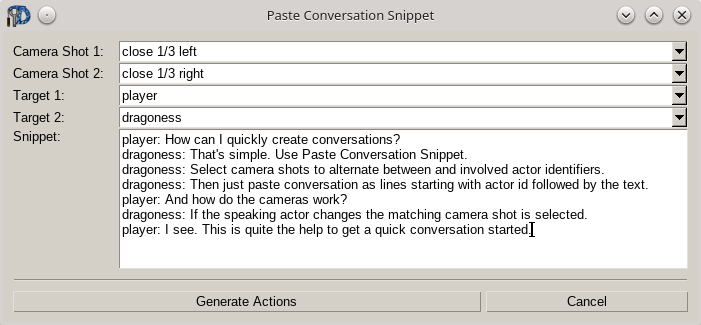
The Snippet text field contains the snippet to generate. Write it down similar to a simple movie script. Each line is converted to one Actor Speak action. The line begins with the identifier of the actor to speak and the text to speak separated by a colon character. The text to speak is set as the Text Box Text. If the speaking actor has also a speech animation assigned the text is converted to Words and added to the Word line in the Dope sheet. Any number of lines can be added this way. If the speaking actor changes a Camera Shot action is added using the parameters above.
The Camera Shot 1 and Camera Shot 2 define the identifier of the Camera Shot to use when switching to the first or second actor appearing in the snippet text field.
The Target 1 and Target 2 sets the targets to use by the camera shots. If the first actor speaks Target 1 is used as camera shot target and Target 2 is used as camera shot look-at. For the second actor speaking it is vice-versa.
View Panel
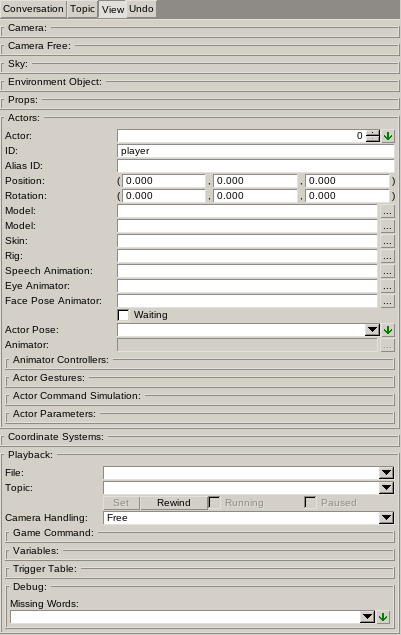
Conversation playback is handled by a game script provided by the chosen scripting language. Before starting a conversation the user has to add Conversation Actors taking place in the conversation from the beginning. Additionally the user can set Conversation Variables. Conversation variables are integer variables the conversation actions can read and modify. This allows to modify the behaviour of conversation scripts or to check the outcome of a conversation. Once all is ready the conversation playback starts by specifying a Conversation Group and Conversation Topic. Once the playback finishes a playback callback or listener is called to allow the game scripts to take the next actions.
This panel contains various parameters to simulate conversations and testing dynamic conversation behavior.
The Camera panel shows the currently selected camera parameters (free, camera shot or conversation). The Camera Free panel shows the free camera parameters.
The Sky panel defines the Sky resource to use in the preview view.
The Environment Object panel defines the Object Class to use as environment the conversation is previewed in.
The Props panel allows to add props to the scene. This can be used to simulate the important aspects of a scene to ensure conversations are properly working, for example camera shot placements or ensure actors looking at props is working as expected.
The Actors panel allows to define the actors to play the conversation with. This panel contains a bunch of sub panels all defining aspects of the actor for example what model, skin and rig to use as well as the various animators to use. Dynamic behavior can be simulated using the Actor Command Simulation and Actor Parameters.
The Actor Command Simulation sub panel defines a list of actor commands supported by Actor Command condition. Use the context menu to add and remove entries from the list. Entries in the list show a minus or plus sign indicating if the command will return true or false if simulated. To switch the result of an entry in the list double-click MOUSE_LEFT on the list item.
The Actor Parameters sub panel defines parameters that can be checked using the Actor Parameter condition. Use the context menu to add and remove entries from the list. Adding an entry asks for the integer value the parameter will return if simulated. To change the value of a parameter in the list double-click MOUSE_LEFT on the list item.
The Coordinate Systems panel allows to add named conversation coordinate systems to be simulated. Simulating Add Coordinate System and Remove Coordinate System uses this.
The Playback panel controls the playback of the conversation.
The Game Command sub panel defines a list of game commands supported by Game Command condition. Use the context menu to add and remove entries from the list. Entries in the list show a minus or plus sign indicating if the command will return true or false if simulated. To switch the result of an entry in the list double-click MOUSE_LEFT on the list item.
The Variables sub panel defines conversation variables. These are typically set in game scripts to control the flow of conversation. Use the context menu to add and remove entries from the list. Adding an entry asks for the integer value the variable will return if simulated. To change the value of a variable in the list double-click MOUSE_LEFT on the list item. Here you can also see changes to conversation variables done by Set Variable actions.
The Trigger Table sub panel defines trigger targets to simulate. Use the context menu to add and remove trigger targets from the list. Entries in the list show a minus or plus sign indicating if the trigger target is in the fired or not fired state. To switch between fired and not fired state double-click MOUSE_LEFT on the list item. The list entry will also show behind the trigger name if the trigger has ever fired or never fired. Use the context menu to full reset a trigger target. Here you can also see changes to the trigger targets done by Trigger actions.
The Debug sub panel contains some debug helper information. The Missing Words list shows all words used in all processed Actor Speak actions which are not present in the speech animation file assigned to the actor. Using the menu button the list opens in a new dialog ready to be copied for example to a bug report.
Setting up conversation test setups can be time consuming. To avoid repeating this process over and over again the setup stored in the Actors, Coordinate Systemes and Playback panel can be persisted to Conversation Test Setup files (*.dects) using the view menu.
You can also persist a single actor configuration from the Actors panel to Conversation Actor Setup files (*.decta) using the view menu. Loading a conversation actor setup replaces the selected actor.
You can also save the playback simulation states from the Playback panel to Conversation Test Game State files (*.dectgs) using the view menu. This includes the game commands, variables and trigger table.
Dope Sheet
TODO

