Table of Contents
Start Page » Game Development with the Drag[en]gine » Drag[en]gine Integrated Game Development Environment » Skin Editor
IGDE Skin Editor
The skin editor allows to create skin resources for your game. Skins resources are static resources assigned to Components or other objects that you can modify during run time using Dynamic Skins. They use Physically Based Rendering and are defined using Skin Texture Properties. See the List of Texture Properties for detailed information about what you can achieve using skins.


Texture

Shows the list of all Textures in the skin. Textures have a unique Name which is used to match textures in Model resources. The texture name in the Model resource is the master name so match adjust skin texture names to match.
The Texture Preview panel allows to set texture transformation parameters to apply to the preview model. They are not saved to the skin.
The Property panel shows the list of all Skin Texture Properties assigned to the texture. You can use any name for the properties you like as long as the Graphic Module understands them. See the List of Texture Properties for the officially supported properties. You can find this list also in the IGDE by using the Settings → Texture Property List menu command.
All properties share the Name and Renderable parameter. If Renderable is not empty string the game scripts can assign a Dynamic Skins and add a renderable with matching name to dynamically alter the content of all properties using the same renderable name.
Each property has a Value Type indicating how the content of the property is produced. The panel below changes depending on the selected value type.
Constructed View
The Constructed View is used to edit Constructed texture properties. This allows to define the content of a property using a vector graphic application type approach. Using constructed textures allows to increase the variety of textures in your game without needing to create individual variants of images. This not only reduces the work load but also memory consumption and reduces the final *.delga size. Constructed images are static in nature.
Use the MOUSE_RIGHT context menu to add, remove and manipulate nodes.
Nodes can be grouped to manipulate them as a unit. To enter a group MOUSE_LEFT double-click on the node group or use the context menu Enter Group. To exit a group MOUSE_LEFT double-click outside the group or use the context menu Exit Group.
To Group Nodes select/unselect them using SHIFT+MOUSE_LEFT. Once you have all nodes selected use the context menu Group Nodes to group them.
To Ungroup Nodes select the node group by MOUSE_LEFT then use the context menu Ungroup nodes.
When a node or node group is selected a bunch of edit points are shown around the node.
To Move the node MOUSE_LEFT inside the node without hitting any edit points and drag the node to the desire location.
To Resize the node MOUSE_LEFT on the blue arrows to resize the node into the direction the arrow points.
To Rotate the node MOUSE_LEFT on the orange arrows to rotate around the center of the node.
To Shear the node MOUSE_LEFT on the green arrows to shear along the direction the arrows points.
To Rearrange the node press:
- HOME to raise the node to the top
- END to lower the node to the bottom
- PAGE_UP to raise the node above the node right above it
- PAGE_DOWN to lower the node below the node right below it
To Delete the node press DEL.
To clear the selected node click into empty space outside any node.
At the bottom right you can change the Zoom Factor as well as panning the canvas.
Next to the zoom combo box you find Layer Selection spin button. The constructed texture property has not only a Width and Height but also a Depth which usually is 1. Depths larger than 1 are used for environment maps or variation properties. Each layer represents a variation in this context. You can switch between the layers by using the Layer selection spin button.
Nodes have a 3-point value to define their position and size. The third point is the Starting Layer. If a node has a size with a third component larger than 1 then the node spans multiple layers. Hence a node with position.z=2 and size.z=3 will be visible on layers 2, 3 and 4 (with 0 being the first layer).
Node

Shows list of Nodes in the selected texture property if it is of value type Constructed. The parameters of the selected node are shown below.
The Node panel contains general parameters in common to all node types.
The Mask field below shows the mask node assigned. Mask nodes hide parts of the nodes they are assigned to. White color is visible while black color is hidden. Gray scale values in betwen produce transparency effects.
Below is the panel showing node type specific parameters.
Dynamic Skin

Allows to edit a preview Dynamic Skins to test how a skin behaves if a dynamic skin is used in-game.
The Name parameter is the unique name of the renderable. It has to matcht the renderable name used in properties.
The Type parameter defines the Renderable Type. This defines how the renderable content is defined. The panel below changes depending on the value type selected.
View
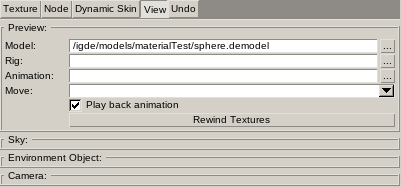
The Preview panel defines the Model and Rig resource to use to preview the skin. Without a model skin is visible.
The Animation and Move parameter allows to assign an Animation resource to play an animation while previewing the skin.
The Rewind Textures button resets the textures. This is useful to test animated textures, especially those not playing in a loop.
The Sky panel defines the Sky resource to use in the preview view.
The Environment Object panel defines the Object Class to use as environment the rig is previewed in.
The Camera panel shows the parameters of the camera in the preview view. The values can be manually edited.
