Table of Contents
Start Page » Game Development with the Drag[en]gine » Drag[en]gine Integrated Game Development Environment » World Editor
IGDE World Editor
The world editor allows to edit World resources (*.deworld) for your game. World resources glue together many other resource types. See the Game Development With The Drag[en]gine section to learn more.
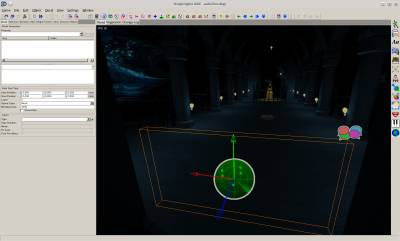
The editor window composes of the content area and the properties panel on the left side. Three different content area exist:
- World View: Edit the world content. This is the view you will be using the most.
- Vegetation View: Edit Vegetation Rules used to populate height terrains with automatically placed geometry.
- Changelog View: Shows changed elements that have to be stored to explicit files like height terrain images.
World View
The world view shows the world content to edit. See 3D-View Navigation for how to navigate the view. By default this view is set to an FPS type camera navigation.
The view operates using a CAD like interface. You can switch Element Mode and Work Mode.
Element Mode
Selects the type of world element to operate on. Supported are these element types
Object
Work on instance of Object Classes. Object classes represent static and dynamic objects (elements) backed up by Game Script Objects. Typically these are Script Classes but can be anything depending on the Scripting Module used.
Object classes are defined in the Game Definition Editor by the mapper. The separation between Game Script Object and Object Class in the Game Definition is on purpose. The Game Script Object is in full control of the coder while the Object Class is in full control of the mapper. This separation allows artists to work on the game without needing working game code and to shape the object classes the way they help them work efficiently.
The interface between the mapper and the coder is solely defined by the Object Class Name, the Object Properties and the Texture Properties.
See Selection Panel for further information.
Decal
Work on instance of World Decals. World decals added to the world are projected onto Object Classes they touch. The game scripts decide what object class they will actually affect in-game. The result shown in the editor is thus not fully representative depending on your setup.
World Decals add Decal resources during game loading. Game scripts are free to add Decal resources themselves at run-time to Component resources.
Navigation Space
Work on instance of Navigation Spaces and Height Terrain Navigation Spaces.
Navigation Spaces allows to add World Navigation Spaces. These are created and added during world loading time. Object classes can add individual navigation spaces. This edits world ones.
Height Terrain Navigation Spaces add navigation space support to Height Terrains resources allow AI to navigate them. This is similar to Navigation Space but for height terrains.
In this mode you can edit the Height Terrain Navigation Spaces directly in the world editor in contrary to Navigation Spaces which are loaded from files.
See the Navigation Space and Navigation Type sub panels in the Height Terrain panel for further information.
Object Shape
Work on Object Properties of Shape or Shape List type. Shapes are stored in an encoded form in object properties. Using this view mode you can edit the content of such properties in a visual way.
You have to first use Object Mode to select the object whose properties you want to edit. Then switch to the Object Shape mode. Here you can select from the Shape panel the Object Property you want to edit. All shapes of all supported properties are shown but only the shapes of the selected property are highlighted to edit.
Work Mode
Selects the type of manipulation to apply to the selected Element Mode. Not all work modes are supported by all element modes.
Select
Element selection consists of a list of all Selected Elements with one of the selected elements being the Active Element.
- MOUSE_LEFT: Add element to selection if not selected and mark it the active element.
- SHIFT+MOUSE_LEFT: Remove element from selection.
- MOUSE_LEFT drag: Draw a Selection Box. All elements touching the box are added to the selection.
- MOUSE_WHEEL (while dragging Box Rectangle): Increase/decrease the Selection Distance. Only elements touching the 3-Dimensional box formed by the drawn rectangle area and the current Selection Distance are selected.
- CTRL+Alt: Clear selection.
Move
Moves the selected elements along the View Plane.
- MOUSE_LEFT drag: Move elements along View Plane. If Snap Move is enabled in View panel movement distance is limited to multiples of Snap Move distance.
- SHIFT+MOUSE_LEFT drag: Same as above but limits if Snap Move is not enabled.
- X: Toggle locking movement around X-Axis.
- Y: Toggle locking movement around Y-Axis.
- Z: Toggle locking movement around Z-Axis.
- L: Toggle locking axis between World and Element Local coordinate system.
Scale
Scales the selected elements along the View Plane.
- MOUSE_LEFT drag: Scale elements along View Plane. If Snap Scaling is enabled in View panel scaling factor is limited to multiples of Snap Scaling factor.
- SHIFT+MOUSE_LEFT drag: Same as above but limits if Snap Scaling is not enabled.
- X: Toggle locking scaling along X-Axis.
- Y: Toggle locking scaling along Y-Axis.
- Z: Toggle locking scaling along Z-Axis.
- L: Toggle locking axis between World and Element Local coordinate system.
Rotation
Rotates the selected elements along the View Plane. Use Edit → Rotation Pivot Center … to set how elements are rotated:
- Rotation Pivot Center Active: Rotate around position of active element.
- Rotation Pivot Center Selected: Rotate around average position of all selected elements.
- Rotation Pivot Center Individual: Rotate around individual element positions.
These key bindings can be used:
- MOUSE_LEFT drag: Rotate elements along View Plane around Pivot. If Snap Rotate is enabled in View panel rotation is limited to multiples of Snap Rotate factor.
- SHIFT+MOUSE_LEFT drag: Same as above but limits if Snap Rotate is not enabled.
- X: Toggle locking rotation around X-Axis.
- Y: Toggle locking rotation around Y-Axis.
- Z: Toggle locking rotation around Z-Axis.
- L: Toggle locking axis between World and Element Local coordinate system.
Add New
Add new element to the world:
- MOUSE_LEFT: Adds element to world. Moves the element along the view direction across clicked position until hitting an obstacle.
- CTRL+MOUSE_LEFT: Same as above but placing element fixed distance in front of the camera.
If you keep the mouse button pressed the mode temporarily switches to Move until you release the mouse button. While dragging you can use these additional key bindings:
- SHIFT: While pressed the object is randomly rotated along Y-Axis while moved. This adds randomness while adding elements without the need to manually adjust orientation. An example use for this is placing trees and other vegetation with random rotation around their trunk.
While moving the newly added element snaps to nearby Snap Points of object. If the newly added object also has snap points these will be used for snapping too. Hence each snap point of the newly added object can snap to any snap point of nearby objects.
Height Paint
Paints the Height Image of a Height Terrain. See the Height Painting sub panel in the Height Terrain panel for further information.
Mask Paint
Paints the Mask Image of a Height Terrain. See the Mask Painting sub panel in the Height Terrain panel for further information.
Visibility Paint
Paints the Visibility Image of a Height Terrain. See the Visibilty Painting sub panel in the Height Terrain panel for further information.
World Panel
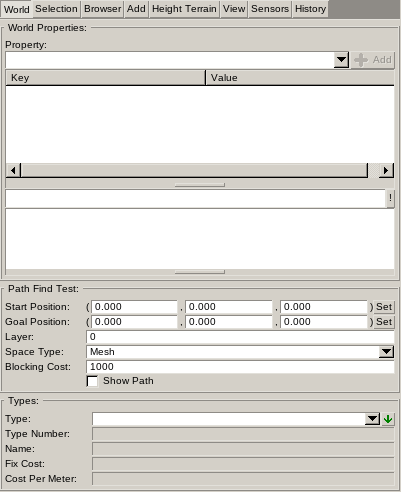
The World Properties defines properties applying the world resource as a whole. They work similar to Object Properties and are define in the Game Definition. Game scripts typically evaluate these properties during Game World Loading.
Path Find Test
Allows to test Navigation Spaces of Object Classes and Height Terrain Navigation Spaces.
The Start Position and Goal Position can be manually entered or set from the current camera position using the Set button. The AI Module will pick the closest position on the available navigation spaces inside a maximum range of 1m as actual start and goal position to use for testing.
The Layer and Space Type define which navigation spaces are used for the test.
The Blocking Cost defines the maximum cost value before a path is considered blocked and not evaluate further.
Once all parameters are set tick Show Path to make the path visible. While visible the path will be updated if the above parameters change.
The Types panel allows to define Cost Parameters for Navigation Types. All navigation space elements are assigned a Type Number. If a type is defined with matching type number it is used to calculate the path costs. See Navigation System For further details.
Selection Panel
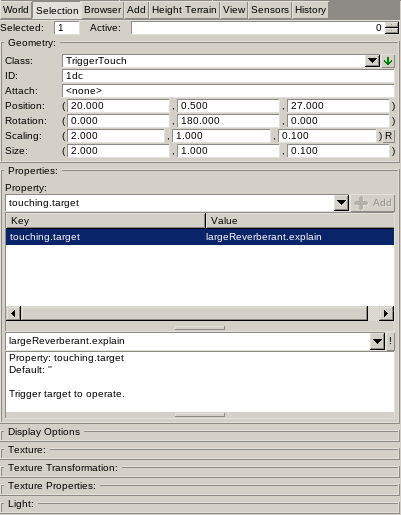
Shows parameters of the selected Object Class or Decal.
Geometry
Contains Object Class parameters if Object Mode is active and one or more objects are selected.
The Selected field shows the count of selected objects. The Active field shows the index of the activate element. Use the spinner to switch the active element amongst selected elements.
The Classs is the unique name of the Object Class used by the game code to instantiate whatever game object is providing the desired functionality. This can range from physical objects to pure virtual objects like triggers.
The ID is the unique identifier of the object instance. The world editor stores a next-identifier counter for each game world. Whenever a new object is added the next identifier from the counter is assigned. The counter never counts backwards. This way updating game worlds for your game keeps save-states intact. The identifier is shown as hexadecimal value.
The Attach field shows the ID of the object this object is attached to if any at all. To attach objects select the object to attach and the object to attach to. With the object to attach as active object use Object → Attach To menu command. To detach set the attached object as active object then use Object → Detach menu command. Attaching is an information provided to the game scripts. The game scripts are responsible to decide how to attach the object. Object Properties can contain additional information used by the game scripts to perform attaching during loading time.
The Scaling is the scaling factor relative to the base size of the object. The Size is the effective size of the object. The two values are linked so changing one value recalculates the other. Object classes can limit the scaling possibilities:: Free (all scaling possible), Uniform (all scaling components are equal) or Fixed (no scaling possible).
The Properties defines a list of Key → Value pairs. They define configurable object parameters the mapper can adjust. The values are generic String type values. This allows mapper and coder to agreed upon any kind of value format they want to use. Common value types are pre-defined by the IGDE with the Property Table Widget providing suitable UI widgets to edit them. Underneath though the values are all string type so you can edit the bare string value at all times.
The Texture, Texture Transformation and Texture Properties panels allow the mapper to fine tune texture related aspects of the object. You can add any number of Texture Replacements as long as their Texture Name is unique. You can also add non-existing texture names for example to support different Model resources. How texture replacements are handled is up to the game scripts. In general the Component resource used for the game object is modified.
The Skin defines a replacement skin to use for the texture. A texture replacement is ignore if no skin is assigned. Upon adding a new texture replacement the world editor fills in the skin used by the texture as defined in the object class.
The Tint defines a tint color to use to colorize the replacement skin. The game scripts can assign Dynamic Skin resources to a texture replacement to manipulate Skin Texture Properties using a static value. The tint color is automatically added by the basic game scripts if it is not white. Unless change it does affect skin texture properties with Renderable Name tint.
The Translation, Scaling and Rotation define Texture Coordinate Transformation to apply to the texture. All translations are relative to the center of the texture image.
The Texture Properties work similar to Properties. They can be used to add advanced configurable parameters to individual texture replacements.
The Light Panel shows helper UI widgets to edit Object Properties linked to Light Parameters. Changing the value of a parameter in this panel will update the respective object property if present.
Browser Panel
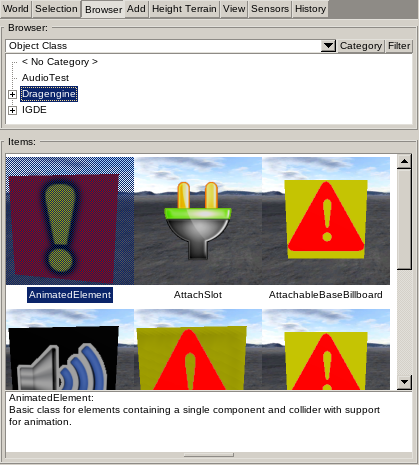
Shows list of Object Classes, Skins and Sky. Two display modes are available: Category and Filter.
Using category display mode the category list of the selected element type is displayed as a tree list. Select a category to display all elements assigned to this category in the list below.
Using filter display mode a filter text field is shown. Enter filter to show in the list below all elements matching the filter no matter what category they belong to. The filter is case insensitive plane text. The filter string is matched anywhere inside the element name or path (for skin and sky resources).
The list below shows the elements. The list can be shown using preview images or as text list only.
Object Classes
If objects are selected in the game world MOUSE_LEFT double-click on an element to assign the object class to them.
Skin
If objects are selected MOUSE_LEFT double-click on an element to assign the skin to the Active Texture of each object. The active texture of an object is the texture which is currently selected in the Texture sub panel of the Selection panel.
If decals are selected MOUSE_LEFT double-click on an element assigns the skin to the decals.
If an active object is present MOUSE_RIGHT shows a context menu where you can assign the skin to a specific texture from this object.
Sky
MOUSE_LEFT double-click on an element to assign the sky to the world for preview purpose only.
Height Terrain Panel
Sector
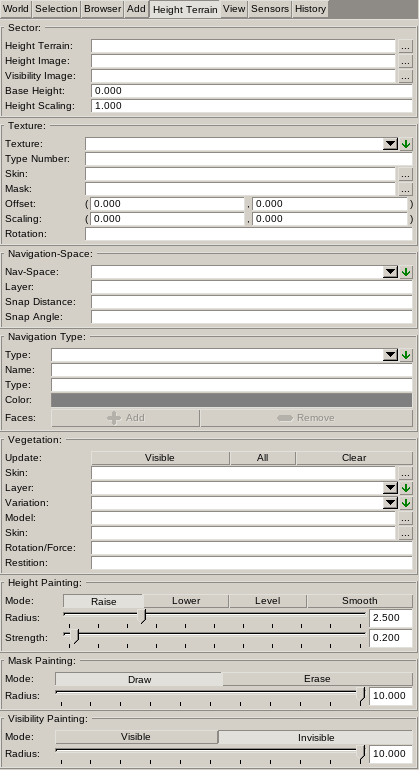
Height terrains are split into Sectors of equal square size. This allows to split up large terrains into smaller sectors. Each sector store its own image files.
The Height Terrain is the file storing the entire height terrain information (*.dehterrain).
The Height Image defines the height of sector points and is a greyscale image. The image is best using 16-bit bits per pixel.
The Visibility Image defines the visibility of sector faces and is a black-and-white image with pixel values of 1 for visible and 0 for invisible (hole).
The Base Height and Height Scaling define how the final Y-coordinate of the sector points are calculated. These values are the same for all sectors.
y = heightTerrain.position.y + baseHeight + heightImage.at(indexX, indexY) * heightScaling
Texture
Defines the Texture Layers used by the height terrain. Texture layers are rendered in the order they are defined form the top entry in the list to the bottom entry in the list.
The Type Number is a custom number you can assign to textures to identify them later on in the game.
The Skin is the skin to use for rendering the texture.
The Mask is the image to store the texture mask in and can be Painted. This image is stored to the game data directory and loaded during world loading. The mask image is a greyscale image storing the visibility of the texture at each sector point. A value of 1 paints the texture fully opaque while a value of 0 does not render it at all. Mask values are interpolate across sector faces to obtain smooth transitions.
The Offset, Scaling and Rotation parameters apply a Texture Coordinate Transformation to allow using skins in tiled mode. This is especially useful with Variation Skin Texture Property. This allows to increase the visual resolution of the skin while reducing repetition effects.
Navigation Space and Navigation Type
Defines a list of Height Terrain Navigation Spaces to allow AI to navigate the terrain. See Navigation System for further information.
Navigation spaces are define using Convex Faces. While in Navigation Space Mode you can MOUSE_LEFT to select a single point and SHIFT+MOUSE_LEFT to select multiple points. Once you have 3 or more points selected you can use the Add button to add a face using the selected type.
To delete faces you have multiple ways to do it all done by selecting navigation points then clicking the Remove button:
- 1 selected point: All faces using this point as one of their corner points are removed.
- 2 selected points: All faces using an edge with the two selected points as edge end points are removed.
- >2 selected points: The face with all its corner points matching the selected points will be removed.
For each navigation space a list of Navigation Types has to be defined. Types define Cost Functions allowing to influence how AI calculates path.
The Type value is the same as used for other navigation spaces in-game.
The Color is used to distinguish in the edit view which face belongs to which type. The color is not use in-game.
Vegetation
Parameters for handling vegetation generation on height terrains
TODO
Height Painting, Mask Painting, Visibility Painting
Parameters for modifying the painting of Height Images, Texture Mask Images and Visibility Images.
View Panel
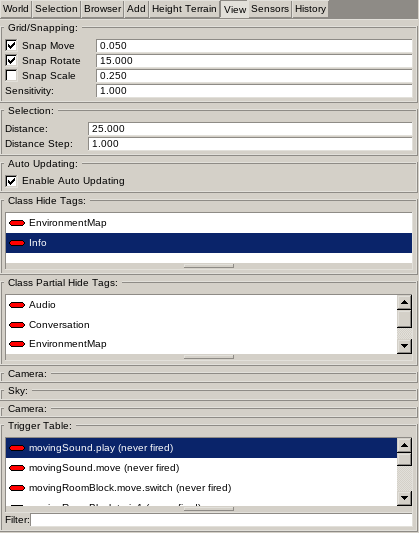
Parameters for adjusting the view.
Grid/Snapping
Defines snapping steps for Move, Rotate and Scale work mode.
The Sensitivity defines the scaling factor applied to mouse movement converted to world coordinates. Raising the sensitivity above 1 moves faster across the world which is useful to move to distant parts of the world quickly.Lowering the sensitivity below 1 moves slower across the world which is useful to make small scale editing task easier. 1 is the default.
Selection
Defines the distance of the box used in Selection work mode. Objects beyond the distance are not selected. The Distance Step defines distance increment/decrement step if MOUSE_WHEEL is used while dragging the selection box.
The Auto-Updating is used with vegetation system. If enabled changes to the vegetation rules are immediately updated. If disabled you have to update the preview in the Vegetation sub panel in the Height Terrain panel. Disabling this is recommended since updating large vegetation fields can cause editing delays.
The Class Hide Tags shows the list of Hide Tags define in all known Object Classes. MOUSE_LEFT double-click on entries to toggle between visible and hidden. All object classes using any tag marked hidden will be hidden.
The Class Partial Hide Tags shows the list of Partial Hide Tags defined in all known Object Classes. MOUSE_LEFT double-click on entries to toggle between visible and hidden. All object classes using any tag marked partially hidden will be visible but some of their content is hidden. For example lights still showing the lights if partially hidden but their representative billboard is hidden.
The Camera panels define which camera to use to show the world and allows to edit the camera parameters. Three cameras can be used: Free Roaming, Player and Object. The free roaming camera is the default and is used for editing allowing to move freely across the map. The player camera allows to move using FPS-like controls through the world (currently not supported).
The object camera shows object cameras. Object classes can define Cameras. These object classes typically allow the player to use a camera in-game attached to the object. Select the object from the list below and switch to the object camera to see how the in-game camera would look like.
While the object camera is active moving the camera view does change the object position. All other cameras to not change object positions.
The Sky defines the camera to use to preview the game world. This is not the sky used in-game. To define one or more skies to use for the map add Object Classes supporting Sky resources (for example BaseSky). The editor will always shows the preview sky.
The Trigger Table shows a list of all known Trigger Targets define by object instances present in the world. MOUSE_LEFT double-click on entries to toggle between Fired and Reset state. To do a Full Reset use the context menu. Using the Filter you can show only triggers containing the filter text case insensitive.
