Table of Contents
Start Page » Game Development with the Drag[en]gine » Drag[en]gine Integrated Game Development Environment » Animator Editor
IGDE Animator Editor
The animator editor allows to edit Animators and Animations for your game.
Animators are composed of a Rig and Animation resource, controllers to influence the animation dynamically and rules for producing the animation.
The editor window is divided in the preview area and the properties panel on the left side.
Preview Window
The preview window shows the preview of the animator. See 3D-View Navigation for how to navigate the view. To see the animation you have to assign a Model Resource and Skin Resource in the view panel. Alternatively you can switch on bones display mode in the Edit menu.
In addition to the regular 3d-view navigation you can activate Locomotion Testing by pressing CTRL+L. With locomotion testing activated the keyboard and mouse are captured by the animator editor similar to a game situation. The mouse input simulates looking up-down/left-right. The keyboard controls simulate actor movement with the following bindings:
- W: Move forward
- S: Move backwards
- A: Move/Strafe left
- F: Move/Strafe right
- Q: Toggle crouching
- E: Toggle running
- ESC: Exit locomotion testing mode
If the playground panel is active you can easily verify how the controller values change and what the animator is doing.
Optionally the Wakeboarding mode by pressing CTRL+W. With wakeboarding testing activated the keyboard and mouse are captured by the animator editor to test animator reaction to changing ground shape. This is typically used for animators supposed to align actor legs and feet with the ground. In this mode a plane is placed underneath the animator. The mouse left-right/up-down movement tilt this plane. These keyboard bindings are supported in this mode:
- ESC: Exit wakeboarding mode
Only one of these two testing modes can be active at the same time.
Animator
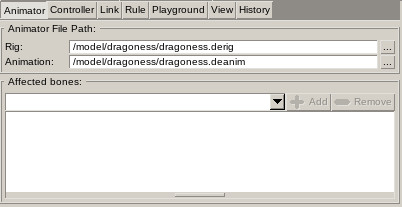
Defines the Rig and Animation resource to use for the animator. At least the rig resource is required to be present. The animation resource is not required if only procedural rules are used.
The Affected Bones list defines names of bones affected by the animator. If the list is empty all bones are affected by the animator. This can be used to animators affecting individual body areas of actors, for example upper and lower body.
Animators can only be used on Component resources using the same rig resource. If the rig resource is mismatching the animator has no effect.
Automatic and manual retargeting of animations will be added in a future release.
Controllers
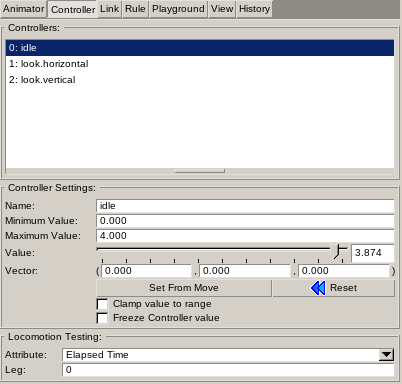
Controllers are used by game programmers to adjust the animation. In general the artist defines the controller ranges but game programmers can overrule them to make their life easier. This does not interfere with the animation production process. The output of the controller is the Value linearly mapped from the range Minimum Value → Maximum Value to the range 0 → 1.
Controllers are typically accessed by the game developer using the unique Controller Name (case sensitive). This allows to mix and match different animators with differing controller setups (count, ordering and ranges) as long as the required names are present.
The controller list is an ordered list. For this reason controllers are shown with their index number too. Game developers can use this index number as an alternative to controller names.
Controllers can also provide vector values. This is typically required for animations requiring to target locations relative to the owner Component Resource coordinate frame. The Vector value allows to set the vector output by the controller for testing animations. The vector value is not processed by links but directly forwarded to rules. Therefore no mapping is applied to vectors.
For rules expecting a rotational input the vector is supposed to contain Euler rotation angles around the X, Y and Z axis in degrees.
The Set From Move button allows to set the controller range from a move in the loaded Animation Resource. Minimum value is set to 0. Maximum value is set to playtime of move in seconds.
The Reset button sets the controller value to the controller minimum value. This is useful for controllers updated by elapsed time to quickly rewind for preview purpose.
The Clamp value to range check box determines if the input value is clamped to the controller range or wraps around if going past the range.
The Freeze controller value is used only for preview purpose to stop a controller from updating its value dynamically.
The Locomotion Testing panel allows to set dynamic behavior to controllers for preview purpose only. The attribute simulates typical ways how games manipulate controller values to get an idea on how the animator will perform if used in the game.
Links
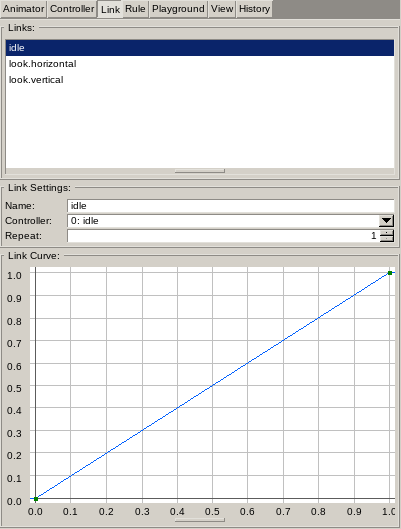
Links map controller values to rule target input values using bezier curves. The artist is in full control of links. This decouples controller ranges allowing game programmers to freely manipulate them as they need.
The curve input range is 0 → 1. The curve output range is also 0 → 1. Hence using a default linear curve forwards controller output values unmodified to rule target input values. See Bezier Curve Editor for usage.
Links have a unique Name used to identify them in rule targets. The link list is sorted alphabetically.
The Controller value indicates which controller is used as input for the link. If no controller is assigned the link uses 0 as input value.
The Repeat value allows to repeat the curve multiple times. This is useful for jig-saw type curves which can not be done with a bezier or linear type curve. This is also useful for overlaid detail animations. There you can easily adjust their play speed relative to the main animation.
Rules
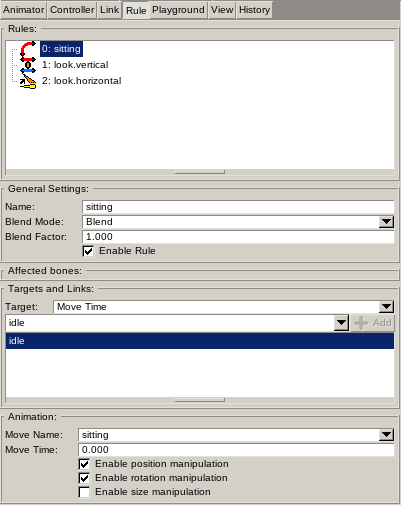
Rules define how the animation is produced. Rules are processed from top to bottom in the order they are specified. Rules can produce pre-canned animations or procedurally calculated animations. See Animators and Animations for a comprehensive explanation of rule types. Depending on the selected rule type the panel layout below is different.
Rules can be grouped using the Group rule. Groups can be unfolded in the list. Inside a group children rules can be added. The animation state of the group rule is produced by processing the children rules from top to bottom in the order they are specified.
The Sub Animator rule allows to apply another animator file as if the content of the animator rule is used instead of the sub animator rule. Controllers in the sub animator are matched using their controller names. By default all controllers are matched. You can though specify a custom list of controllers to map to sub animator controllers which is not required to be of the same name.
The General Settings panel is present for all rule types and contains settings all rule types support.
The Name of rule is used for display purpose and is not required to be unique. It is though recommended to use unique names to help recognize the rules.
The Blend Mode indicates how the animation produced by the rule is combined with the animation state present before the rule is applied. Two modes can be used: Blend and Overlay. Blend mode blends linearly between the animation state and the rule produced animation. Overlay mode super-imposes the rule animation on top of the previous animation state.
The Blend Factor is used by the blend mode to influence the strength of the blending. Blend factor can be used on all blend modes. For blend mode blend the blend factor is clamped to the range 0 → 1. For overlay blend mode the factor is only clamped to stay above 0.
The Enable Rule allows to keep rules in your animation but disabling them. It is possible to re-activate rules at run-time but usually it is better to use this feature only during development time.
The Affected Bones panel is present for all rule types and contains an optional list of Bone Names. If the list is empty the rule affects all bones in the owner Component. If the list is not empty only bones matching the names listed are affected.
If you use Group rules you have to make sure the list of affected bones of the group rule and all rules underneath are compatible. If the group rule has an affected bone which is not present in the children rules the default state is used which can be not what you intend.
The Affected Vertex Position Shape panel is present for all rule types and contains an optional list of Vertex Position Shape Names. If the list is empty the rule affects all vertex position sets in the owner Component. If the list is not empty only vertex position sets matching the names listed are affected.
If you use Group rules you have to make sure the list of affected vertex position sets of the group rule and all rules underneath are compatible. If the group rule has an affected vertex position set which is not present in the children rules the default state is used (0 weight) which can be not what you intend.
The Targets and Links panel is present for all rule types. The list of available targets depends on the rule type. Targets define rule parameters that can be manipulated using controllers via links. Each target can have one or more links assigned. If more than one link is assigned their output values are multiplied together. For this reason links produce output values in the range 0 → 1. If no link is present an input value of 0 is used.
The last panel below changes according to the type of the selected rule. See Animators and Animations for an explanation of the parameters used.
Playground

The playground panel allows to quickly manipulate all controllers in a comprehensive list to test out the animation. Controllers which have a dynamic test attribute assigned can not be manipulated but their current state can be watched.
The remaining panels below are used for the Locomotion Testing mode only. Most of the time you do not need to change them except movement speed to better reflect in-game movement situations.
The Locomotion Testing panel contains parameters influencing controllers with attributes set for locomotion testing.
The Movement Speeds panel contains parameters influencing the movement speed of the simulated actor. This is useful to verify if actor animations for specific speeds are correct and do not exhibit feet shuffling.
The Adjustment Times panel contains parameters setting various adjustment times to make the testing smoother.
The Legs panel contains parameters for feet-on-ground type animators. (note: this is work in progress and not functional yet).
The Visualization panel allows to enable some debug shapes to visualize some parameters.
View
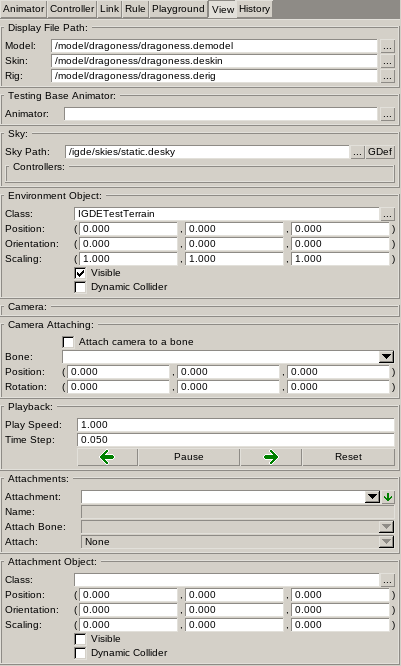
Preview and simulation parameters can be adjusted in this panel.
The Display File Path panel defines the Model, Skin and Rig resource to use to preview the animator. Without these resources set you have to enable the bones preview in the edit menu to see the animation. Even with preview model visible the bones can be shown to help identify specific problems.
The Testing Base Animator panel allows to set another animator file as the base animation. If used the base animator is applied first then the animator currently being worked on. This allows to test overlay animations modifying other animations. This is used for example in conversations to animated gestures of actors. The controllers of the base animator are matched by name against the controllers of the edited animator controllers. The state of matching controllers are applied to the base animator before the base animator is applied.
The Sky panel defines the Sky resource to use in the preview view.
The Environment Object panel defines the Object Class to use as environment the animator is previewed in. If Wakeboarding is used it is recommended to hide the environment object to better see the wakeboard plane.
The Camera panel shows the parameters of the camera in the preview view. The values can be manually edited.
The Camera Attaching panel allows to attach the preview view camera to bones in the animator. This allows to test first-person type animators where the camera is attached to a bone responsible to provide first-person view animations.
The Playback panel controls playback parameters. You can change the playback speed or pause the animation. While paused the animation time can be manually stepped forward and backward to examine problematic parts easier.
The Attachment panel allows to attach Object Classes. This can be used to verify correct object placement as well as spotting clipping problems if objects are attached to an actor while the animator is used. Attachments can be either attached statically, attached to a single bone or weight attached.
If attached statically the object is attached to the virtual preview actor. In this case no bone has to be specified. This is useful to examine animations relative to a static prop, for example sitting down on a chair.
If attached to a single bone the bone name has to be valid otherwise this behaves the same as static attachment. This attachment type is typically used for attaching weapons or devices to actor hands or attaching props to actor belts or his back.
If weight attached is used the bones of the attached object are matched by name against the bones of the preview model. This attachment type is typically used for attaching cloth to an actor which has to be animated the same way as the base model is animated.
The Attachment Object panel defines what Object Class is used for the selected attachment as well as positional and rotational offset applied. Attachments can be individually hidden to allow switching between different objects. This can be used for example to check a sit down animation against different chair or bench types without needing to modify attachments all the time.
The Dynamic Collider parameter enables physical simulation for an attachment. The object root bone is attached while all bones marked as dynamic are influenced by physics.


